Research IT Cluster Usage Documentation
Introduction
Access to the HPC clusters is via the SSH (secure shell) protocol. You will need an SSH client to login. Windows 10 (and later), Linux and MacOS clients should come with an SSH client installed.
Older Windows versions will need an SSH client such as Putty. Legacy documentation on using PuTTy available here
Most Research IT hosted clusters are accessible from the Trinity networks, including VPN. They are not directly accessible from the internet.
The Research IT access host is rsync.tchpc.tcd.ie which is accessible from the internet and from which other Clusters can be accessed.
| Resource | SSH URL | Access from | Access for |
|---|---|---|---|
| Rsync | rsync.tchpc.tcd.ie |
Internet & Trinity | Research IT access & bastion host |
| Kelvin | kelvin.tchpc.tcd.ie |
Trinity | All Trinity researchers, registration required to run jobs |
| Parsons | parsons.tchpc.tcd.ie |
Trinity | Select groups only |
| Boyle | boyle.tchpc.tcd.ie |
Trinity | Select groups only |
| Boole | boole.tchpc.tcd.ie |
Trinity & select HEI's | Select groups only |
| Seagull | seagull.tchpc.tcd.ie |
Trinity | Select groups only |
| Pople | pople.tchpc.tcd.ie |
Trinity | Select groups only |
| Crusher | crusher.tchpc.tcd.ie |
Trinity | Select groups only |
| Dalton | dalton.tchpc.tcd.ie |
Trinity | Select groups only |
| Tinney | tinney.tchpc.tcd.ie |
Trinity | Select groups only |
The process for connection differs between Linux and Windows client machines. Please follow the relevant instructions.
Logging into Clusters from the Trinity Network
SSH From Trinity - Windows Clients
Open Windows PowerShell and enter the following command
C:\Users\myuser> ssh -l yourusername kelvin.tchpc.tcd.ie
yourusername@kelvin.tchpc.tcd.ie's password:
Notes:
- Enter your password, as prompted.
- Replace
yourusernamewith your own username. - Replace
kelvinwith the correct hostname as per the table above.
SSH From Trinity - Linux & MacOS (OS X) Clients
Open a 'terminal' session and enter the following command
[myuser@myhost ~]$ ssh -l yourusername kelvin.tchpc.tcd.ie
yourusername@kelvin.tchpc.tcd.ie's password:
Notes
- Enter your password, as prompted.
- Replace
yourusernamewith your own username. - Replace
kelvinwith the correct hostname as per the table above.
Logging into Clusters from Outside the Trinity Network
Research IT HPC clusters are not directly accessible from the internet
The Research IT hosted HPC Clusters are not directly accessible from the internet.
If you are trying to connect from the internet to any of our HPC clusters you will first need to SSH into rsync.tchpc.tcd.ie and from there ssh to the relevant cluster.
Rsync is what is known as a "bastion host", i.e. an SSH server on the Research IT network accessible from the internet and from where you can SSH to the HPC Clusters on the Research IT network.
If you are connected to the College network, including the VPN, you should be able to access the clusters directly without having to relay through rsync.tchpc.tcd.ie.
Logging into rsync.tchpc.tcd.ie from the Internet
This only applies to login attempts from the internet.
From the College network either an SSH key or your Research IT password will work.
From October 13th 2022 onwards two factors will be required to login to rsync.tchpc.tcd.ie from the internet:
- An SSH key pair
- Your Research IT password
This change has not been applied yet.
Please note that currently you can login to
rsync.tchpc.tcd.iewith either of your Research IT password or an SSH key pair if you have configured one.
Once this change is made, to login to rsync.tchpc.tcd.ie from the internet you will need both an SSH key and your Research IT password.
If two factor login is not configured for your account
If you have not added an SSH public key to your account on rysnc.tchpc.tcd.ie before two-factor authentication
from the internet is made mandatory, or if your account is created after two-factor authentication from the internet was made mandatory, you will not be able to login to rsync.tchpc.tcd.ie from the internet.
In such circumstances, if you need to be able to login to rsync.tchpc.tcd.ie from the internet you can add a ssh key to your account as per the relevant instructions below from a computer connected to the College network, including VPN.
If you don’t have a ssh public key setup for rsync.tchpc.tcd.ie and cannot access the College network but need to be able to,
please send your public ssh key to ops@tchpc.tcd.ie, (do not send your private key), from the @tcd.ie email address registered with your Research IT account, and we will add it for you.
If you do not have an @tcd.ie email address, we will have to liaise with your collaborator in Trinity to confirm your identity.
Generating SSH Keys for logging in
Secure shell (SSH) access can be configured for both traditional password authentication, key-based authentication or a combination.
Key-based authentication works by having an SSH key pair:
-
A private key which resides only on your local computer (and is never sent across the network).
-
And a corresponding public key which is copied to the remote server that you wish to log into.
The public key can only be used to log in if you are in possession of the corresponding private key.
SSH key passphrases
When generating an SSH key pair you will be prompted to set a passphrase for the SSH private key. This is optional. We strongly recommend setting a passphrase on the SSH key pair though.
If you set one, the passphrase will be required when using an SSH keypair to log in.
Warning - if you do not set a passphrase for your SSH keys.
If your device is stolen or if an attacker gains access to it, they can potentially use your SSH keys to log in without knowing your SSH server password.
SSH Key Pairs - Windows Clients
Applicable for Windows 10 and later, using the OpenSSH client which comes installed on Windows 10 build 1809 (released 2018) and later. For older Windows versions read using Putty on Windows.
Generate Key and Add to Host
- Open Windows PowerShell.
- Generate a strong SSH key with this command:
ssh-keygen -t rsa -b 4096 - By default, the system will save the private key to
C:\Users\myuser\.ssh\id_rsa. Press Enter to use default name or add your own filename. - Display public key.
cat ~\.ssh\id_rsa.pub
- Copy and paste public key into email to
ops@tchpc.tcd.ie. Use subject "Add ssh key". Specify in email which clusters you require access to.
Notes
- If you receive error
... term 'ssh' is not recognized, try legacy documentation using Putty on Windows.
Add Key to ssh-agent
If you haven't already set the OpenSSH ssh-agent to start automatically take the following steps. If you're already running the agent, skip to step 3.
-
Open Windows PowerShell as admin.
-
Set the ssh-agent to start automatically, and start the service.
C:\Users\myuser> Get-Service ssh-agent | Set-Service -StartupType Automatic
C:\Users\myuser> Start-Service ssh-agent
- Load your key files into the ssh-agent. Enter your ssh key passphrase if prompted.
C:\Users\myuser> ssh-add $env:USERPROFILE/.ssh/id_rsa
Full Windows clients guides on how to set up SSH key pairs for logging in.
SSH Key Pairs - Linux & MacOS (OS X) Clients
Check if you already have SSH keys generated with ls -l ~/.ssh. If the id_rsa and id_rsa.pub files exist you already have an RSA SSH key and do not need to generate one as per the following step. Please skip to final step to copy public key.
- Generate a strong key pair.
[myuser@myhost ~]$ ssh-keygen -t rsa -b 4096
-
Follow the instructions.
-
Copy the public key to
rsync.tchpc.tcd.ie:
[myuser@myhost ~]$ ssh-copy-id yourusername@rsync.tchpc.tcd.ie
Notes:
- Enter your password, as prompted.
- Replace
yourusernamewith your own username. -
If you wish to add your key to another system replace
rsyncwith the correct hostname as per the table above. Note: Rsync, Kelvin & Parsons share the same/homefile system so if you copy your SSH public key to any of those it will work for the others. -
If an error message showing "No such file or directory" appears the
~/.sshdirectory will need to first be created with the relevant permissions. You can do so with this command:
[myuser@myhost ~]$ ssh yourusername@rsync.tchpc.tcd.ie "mkdir -p ~/.ssh && chmod 700 ~/.ssh"
To manually add your SSH key pair, append the contents of the id_rsa.pub file to the ~/.ssh/authorized_keys file on the remote server.
Full Linux clients guide.
Logging into rsync from Outside the Trinity Network
If you are not connecting from the Trinity network, (including the Trinity VPN), you first need to SSH to rsync.tchpc.tcd.ie and from there SSH to the HPC cluster you are connecting to.
Both an SSH keypair and your Research IT password will soon be required to login to rsync.tchpc.tcd.ie from the internet.
You must have configured an SSH keypair for your rsync.tchpc.tcd.ie login.
Note: This will be made mandatory from October 13th 2022.
SSH from the Internet - Windows Clients
Using Windows PowerShell to login with an SSH key pair. Applicable to Windows 10 & later. For older versions refer to legacy documentation.
You must have configured an SSH keypair for your rsync.tchpc.tcd.ie login.
- Open WindowsPowershell.
-
SSH to
rsync.tchpc.tcd.ie. If keypair configured correctly; -
Before change on Oct 13th: you should be able to login with keypair and no TCHPC password.
- After change on Oct 13th: you should be able to login with keypair and TCHPC password.
C:\Users\myuser> ssh -l yourusername rsync.tchpc.tcd.ie
- Then SSH to the HPC Cluster you wish to access, e.g. Kelvin
[myuser@rsync ~]$ ssh kelvin.tchpc.tcd.ie
Notes
- Replace
yourusernamewith your own username. - You may be prompted for ssh passphrase in step 2, depending on ssh-agent set up.
- If you need to specify a different SSH private key you can do so with the
-iflag. e.g update the-i /path/to/ssh/identity/filevalue with the path to your SSH private key file.
C:\Users\myuser> ssh -l yourusername -i /path/to/ssh/identity/file rsync.tchpc.tcd.ie
SSH From the Internet - Linux & MacOS (OS X) Clients
If you are not connecting from the Trinity network, including the Trinity VPN, you first need to SSH to rsync.tchpc.tcd.ie and from there SSH to the HPC cluster you are connecting to.
Both an SSH keypair and your Research IT password will soon be required to login to rsync.tchpc.tcd.ie from the internet.
You must have configured an SSH keypair for your rsync.tchpc.tcd.ie login.
Note: This will be made mandatory from October 13th 2022.
- Open a 'terminal' session.
-
SSH to
rsync.tchpc.tcd.ie. If keypair configured correctly; -
Before change on Oct 13th: you should be able to login with keypair and no TCHPC password.
- After change on Oct 13th: you should be able to login with keypair and TCHPC password.
[myuser@myhost ~]$ ssh -l yourusername rsync.tchpc.tcd.ie
- Then SSH to the HPC Cluster you wish to access, e.g. Kelvin
[myuser@rsync ~]$ ssh kelvin.tchpc.tcd.ie
Notes
- Replace
yourusernamewith your own username. - You may be prompted for ssh passphrase in step 2, depending on ssh-agent set up.
- If you need to specify a different SSH private key you can do so with the
-iflag. e.g update the-i /path/to/ssh/identity/filevalue with the path to your SSH private key file.
[myuser@myhost ~]$ ssh -l yourusername -i /path/to/ssh/identity/file rsync.tchpc.tcd.ie
SSH Proxy Jump Through a Bastion Host
Bastion Host
Rsync is what is known as a "bastion host", i.e. an SSH server on the Research IT network accessible from the internet and from where you can SSH to the HPC Clusters on the Research IT network.
The ssh command has a way to make use of bastion hosts to connect to a remote host with a single command. Instead of
first SSHing to the bastion host and then using ssh on the bastion to connect to the remote host, ssh ... can create the initial and second connections itself by using ProxyJump or -J flag.
Proxy Jump - Windows Clients
Proxy jump through rsync on Windows clients using the -J flag.
C:\Users\myuser> ssh -J yourusername@rsync.tchpc.tcd.ie kelvin
Notes:
- Replace
yourusernamewith your own username. - Replace
kelvinwith the correct hostname as per the table above.
Proxy Jump - Linux & MacOS (OS X) Clients
Proxy jump through rsync on Linux & MacOS clients using the -J flag.
[myuser@myhost ~]$ ssh -l yourusername -J rsync.tchpc.tcd.ie kelvin
Notes:
- Replace
yourusernamewith your own username. - Replace
kelvinwith the correct hostname as per the table above.
Using graphical apps over SSH
Please see our Graphical User Interface (GUI) application usage notes for full instructions.
If you need to run graphical apps such as Matlab you have to pass -X option to ssh command at each stage of the SSH connection.
E.g. if you first log into rsync.tchpc.tcd.ie you need to do so with the -X flag and then use the ssh -X ... command to login to Kelvin or another cluster from rsync. I.e.
[myuser@myhost ~]$ ssh -X -l yourusername rsync.tchpc.tcd.ie
[myuser@rsync ~]$ ssh -X -l yourusername kelvin.tchpc.tcd.ie
Frequently Asked Questions - FAQS
Frequently asked questions (FAQS):
Q. How to I know if I setup my ssh key correctly?
SSH to rsync.tchpc.tcd.ie. If keypair configured correctly;
- Before change on Oct 13th: you should be able to login with keypair and no TCHPC password.
- After change on Oct 13th: you should be able to login with keypair and TCHPC password.
See full instructions for Windows users or Linux/MacOS users.
Transferring files
Your data is stored remotely on the clusters on our high-performance filesystem. You can see your files when you log in via ssh/Putty.
However, to copy the files to and from your desktop, you must use sftp/scp/WinSCP/Cyberduck to transfer the files.
Transferring to/from a Windows Desktop
The Linux instructions below for sftp and scp should also work on Windows 10 clients.
Transferring to/from a Windows Desktop - Using WinSCP
Alternatively we recommend using WinSCP, which offers an easy graphical interface for copying files to and from your desktop.
Download and install WinSCP.
- Open WinSCP.
- Enter your username and password.
- Enter the hostname you want to connect to
rsync.tchpc.tcd.ie. Leave port as is (22 by default) unless a different one is specified. -
If connecting from outside the Trinity network, you will have to add your private key:
-
Navigate to
Advanced>Authentication>Private key file - Click browse
...to select key. - Change file type from
PuTTY Private Key Files (*.ppk)toAll files (*.*) - Navigate to where your private key is stored (eg
C:\Users\yourusername\.ssh\. Select and open your private key (egid_rsawith corresponding public keyid_rsa.pub) - Convert format if prompted, and enter key passphrase
-
Save configuration if you like.
-
Login.
- Then you can browse the local and remote folders, and copy files between them.
Note:
- If you want to transfer files from outside the Trinity network to a HPC Cluster in TCD you will need to configure WinSCP to Connect through SSH tunnel. Please use
rsync.tchpc.tcd.iein the "Host name" field, your Research IT username and password in the relevant fields and you will need to select the "Private key file" you have configured for your account on rsync.
Transferring to/from a MacOS Desktop using Cyberduck
The instructions below for sftp, scp and rsync should also work on modern MacOS systems.
An alternative is to use the Cyberduck program.
- If you want to transfer files from outside the Trinity network to a HPC Cluster in TCD you will need to configure Cyberduck to Connect via SSH Tunnel Through Bastion Server. Please use
ProxyJump ${YOUR_RIT_USERNAME}@rsync.tchpc.tcd.ie:22as the relevant setting and ensure to replace${YOUR_RIT_USERNAME}with your username. You will need to configure the "Connection window" in Cyberduck to use your SSH key for this to work over the internet, please see here for some instructions from another institution on this.
Transferring to/from a Linux Desktop using sftp
Most Linux distributions come with sftp installed by default. If not, you need to install it.
Then, connect to the cluster on the command-line:
[jbloggs@mydesktop ~]$ sftp kelvin.tchpc.tcd.ie
The first time you connect, you will be asked to accept the key fingerprint of the server.
[jbloggs@mydesktop ~]$ sftp kelvin.tchpc.tcd.ie
Connecting to iitac02.tchpc.tcd.ie...
The authenticity of host 'iitac02.tchpc.tcd.ie (134.226.114.114)' can't be established.
RSA key fingerprint is cb:30:ab:a2:a5:5e:c4:63:ed:55:d0:e1:be:e4:5c:d6.
Are you sure you want to continue connecting (yes/no)? yes
Warning: Permanently added 'kelvin.tchpc.tcd.ie' (RSA) to the list of known hosts.
sftp>
To view the remote files:
sftp> ls
MTA                 README_FIRST_CLUSTER_EXAMPLES          a.out
cpi.x               db.mgmt                                fluent
foo.c               foo.sh                                 foo.txt
h2o                 ipmitest                               job.sh
sftp>
To view local files:
sftp> !ls
code                docs               files               git
src                 stuff              test.txt
sftp>
To upload files:
sftp> put test.txt
Uploading test.txt to /home/trhpc/jbloggs/test.txt
test.txt                                               100% 3012     2.9KB/s   00:00
sftp>
To download files:
sftp> get test.txt
Fetching /home/trhpc/jbloggs/test.txt to test.txt
/home/trhpc/jbloggs/test.txt                           100% 3012     2.9KB/s   00:00
sftp>
Please refer to the man page for more options.
Transferring to/from a Linux Desktop using scp
Most Linux distributions come with scp installed by default. If not, you need to install it.
This command is similar to the standard cp command, but with added syntax for specifying local->remote or remote->local copying.
To copy test.txt from the current directory on your local desktop to your home directory on the cluster:
[jbloggs@mydesktop ~]$ scp test.txt jbloggs@kelvin.tchpc.tcd.ie:test.txt
To copy test.txt from your home directory on your local desktop to the current directory on the cluster:
[jbloggs@mydesktop ~]$ scp jbloggs@kelvin.tchpc.tcd.ie:test.txt test.txt
Using scp through a proxy host
If you need to transfer files from the internet to a HPC cluster in TCD you will need to relay through our access, or bastion, host; rsync.tchpc.tcd.ie.
Note, for this to work you will need an ssh key pair configured for your account on rsync when accessing it from the internet.
Here are some examples. Ensure to replace ${RIT_USERNAME} with your Research IT username. If you want to transfer to or from a system different from Callan you will need to replace callan.tchpc.tcd.ie as the source or destination address with the system you are accessing. You will need to update the path's below with the relevant paths you want the files to be in.
Upload:
scp -r -oProxyJump=${RIT_USERNAME}@rsync.tchpc.tcd.ie /local/source/path ${RIT_USERNAME}@callan.tchpc.tcd.ie:/remote/destination/path
Download:
scp -r -oProxyJump=${RIT_USERNAME}@rsync.tchpc.tcd.ie ${RIT_USERNAME}@callan.tchpc.tcd.ie:/remote/source/path /local/destination/path
Please refer to the man page for more options.
Synchronising files with rsync
The rsync utility is a very useful utility for synchronising files and directories between two different servers.
It is similar in idea to ftp (or sftp), but has the advantage that it will compare the two directory trees on both servers, and only new or updated files are transferred across.
Note that data is normally transferred encrypted using ssh by default, unless rsync was compiled with different options.
Basic rsync syntax
Copying from the local machine to a remote machine:
> rsync <options> local_directory remote_server_name:remote_directory
Copying from a remote machine to the local machine:
> rsync <options> remote_server_name:remote_directory local_directory
There are a number of rsync options (see the man page for full details), but the following are a good set to begin with:
> rsync -arvxHP local_directory remote_server_name:remote_directory
The main rsync options
-a # archive mode
-r # recursive over subdirectories
-v # verbose
-x # don't cross filesystem boundaries
-H # preserve hard links
-P # show progress
-n # no-op, or dry-run
If required, you can specify a different username on the remote server:
> rsync -arvxHP local_directory username@remote_server_name:remote_directory
Testing the transfer first
It is a good idea to test what rsync will do, without actually transferring anything - to ensure that it will put the files in the correct place, and that it will copy what you expect.
This is done by adding the -n flag to specify a no-op or a dry-run.
> rsync -n -arvxHP local_directory remote_server_name:remote_directory
Using rsync when the folder exists on both servers
You have to be careful when supplying the directory paths, in particular whether or not you include the trailing slash or not. We find that the following syntax works well, by specifying a trailing slash and a trailing dot:
> rsync -arvxHP mycode-1.0.0/. joe@kelvin.tchpc.tcd.ie:/home/joe/mycode-1.0.0/.
Warning: omitting the trailing "/." won't work correctly
The following will create a subdirectory of mycode-1.0.0, also called mycode-1.0.0
I.e. you will end up with mycode-1.0.0/mycode-1.0.0, which is not what you want!
# [warning - this doesn't work because we don't have the trailing "/."](#warning-this-doesnt-work-because-we-dont-have-the-trailing-)
$ rsync -arvxHP mycode-1.0.0 joe@kelvin.tchpc.tcd.ie:/home/joe/mycode-1.0.0
Using rsync when the folder doesn't exist on the remote server
rsync can also be used to copy a directory tree, even if the destination directory doesn't exist yet. In this case, we omit the trailing slash and dot:
$: rsync -arvxHP mycode-1.0.0/. joe@kelvin.tchpc.tcd.ie:/home/joe/mycode-1.0.0
rsync relative to home directory
Much of the time, we want to rsync to a destination folder which is sitting in your home directory. In that case, we can omit the absolute path, and just use a path relative to your home directory:
$: rsync -arvxHP mycode-1.0.0/. joe@kelvin.tchpc.tcd.ie:mycode-1.0.0/.
Deleting files on the destination folder
If your local and remote copies of a folder have gotten out of sync, for example if you have tidied up and deleted
files in the local copy, and then would like to synchronise those deletions in the remote copy as well, then you can add the --delete option. Again, it's good to first test with -n as a dry-run, to give you an idea of what would happen:
$: rsync -n --delete -arvxHP mycode-1.0.0/. joe@kelvin.tchpc.tcd.ie:mycode-1.0.0/.
If that matches what you expect should happen, then remove the -n:
$: rsync --delete -arvxHP mycode-1.0.0/. joe@kelvin.tchpc.tcd.ie:mycode-1.0.0/.
Using rsync through a proxy host
If you need to use the rsync protocol to transfer files from the internet to a HPC cluster in TCD you will need to relay through our access, or bastion, host; rsync.tchpc.tcd.ie.
Note, for this to work you will need an ssh key pair configured for your account on rsync when accessing it from the internet.
Here are some examples. Ensure to replace ${RIT_USERNAME} with your Research IT username. If you want to transfer to or from a system different from Callan you will need to replace callan.tchpc.tcd.ie as the source or destination address with the system you are accessing. You will need to update the path's below with the relevant paths you want the files to be in.
Upload:
rsync -av -e "ssh -J ${RIT_USERNAME}@rsync.tchpc.tcd.ie" /local/source/path ${RIT_USERNAME}@callan.tchpc.tcd.ie:/remote/destination/path
Download:
rsync -av -e "ssh -J ${RIT_USERNAME}@Rsync.tchpc.tcd.ie" ${RIT_USERNAME}@callan.tchpc.tcd.ie:/remote/source/path /local/destination/path
Software
A considerable amount of software is installed on our HPC clusters. Please check first to see if the software you need is installed before asking us to install it.
We use the environment modules system to control access to most of the installed software. Quick e.g. to look through it:
$: module load apps gcc
$: module avail
Environment Modules
module load MODULE
module avail
The software stack available to the users is now managed by Lmod for the Kelvin and Parsons Clusters.
Lmod provides a hierarchical view of software installed on the cluster which is grouped at the top level by the compiler used to compile the software.
To see the software packages which have been compiled using each compiler, use the command module load <compiler> e.g., module load gcc/9.3.0. The primary compiler has a 'D' beside its name.
Lmod will be loaded automatically when you log on to the clusters.
NOTE:
When you log into the cluster there may be a delay of a number of seconds before you see a command prompt. This is due to the Lmod loading process. Do not hit Ctrl+C.
The hierarchical environment modules software provides a means to have many different pieces of software easily available on the command-line, including multiple versions of a single piece of software.
The module commands you have been using in the previous setup largely remain the same, but due to the new hierarchical structure, the names of the modules which you load in your batch scripts might need to be modified.
Basic Commands
| Command | Explanation |
|---|---|
module list |
list loaded modules |
module avail Or module av |
list available modules |
module load <module> Or module add <module> |
load modules |
module unload <module> Or module del <module> |
remove modules |
module purge |
unload all modules |
module spider |
list all possible modules |
module spider <module> |
list all possible versions of that module file |
module spider <string> |
list all possible modules that contain that string |
module whatis <module> |
prints information about the module |
module keyword <string> |
search all name and whatis that contain string |
Searching for modules
modgrep <module>
The modgrep utility is available from the Cluster head nodes only. It will search your currently load modules for a string you give it. E.g.
$ module load gcc apps
$ modgrep python
   gdal/3.3.3                          m4/1.4.18                      python/3.8.6
Another useful tip for searching for modules is:
module spider KEYWORD
Where KEYWORD is what you are searching for, e.g
module spider fluent

--------------------------------------------------------------------------------------------------------------------------------------------------------------------
  fluent: fluent/6.3.26
--------------------------------------------------------------------------------------------------------------------------------------------------------------------

    You will need to load all module(s) on any one of the lines below before the "fluent/6.3.26" module is available to load.

      gcc/9.3.0

    Help:
      Fluent.
Step by Step Guide
Example case:
A user logging on to e.g. the kelvin cluster and loading python.
After a successful login, you have access to the system compiler, no modules are loaded:
[username@kelvin01 ~]$ gcc --version
gcc (GCC) 4.8.5 20150623 (Red Hat 4.8.5-44)
[username@kelvin01 ~]$ module list
No modules loaded
[username@kelvin01 ~]$ module avail
----------------------- /home/support/spack/spack-0.16.1/spack/share/spack/lmod/linux-scientific7-x86_64/Core -------------------
   gcc/0.0.1c    gcc/9.2.0    gcc/9.3.0 (D)    intel/19.0.5.281
The module avail command shows the top level layer of the hierarchical module system. Here, it will give an overview
over all available compilers on the system. The (D) marks the recommended default compiler, which the user should load. Depending on your requirements, you can load a compiler different from the default one.
As remarked before, the goal is to load python, which is not visible in the current display of modules. To find out which modules have to be loaded in order to make python available, call module spider python.
[username@kelvin01 ~]$ module spider python

---------------------------------------------------------------------------------
  python: python/3.8.6
---------------------------------------------------------------------------------

    You will need to load all module(s) on any one of the lines below before the "python/3.8.6" module is available to load.

      gcc/9.3.0
Therefore, after executing module load gcc/9.3.0, the module avail command will show you the following
[username@kelvin01 ~]$ module avail

----------------------------------------------------------- /home/support/spack/spack-0.16.1/spack/share/spack/lmod/linux-scientific7-x86_64/gcc/9.3.0 ------------------------------------------------------------
   berkeley-db/18.1.40    diffutils/3.7      gsl/2.5                 libice/1.0.9            libtool/2.4.6     nasm/2.15.05       otf2/2.2         py-setuptools/50.3.2    sqlite/3.33.0         xproto/7.0.31
   boost/1.74.0           expat/2.2.10       inputproto/2.3.2        libiconv/1.16           libuuid/1.0.3     ncurses/6.2        papi/6.0.0.1     python/3.8.6            swig/4.0.2            xtrans/1.3.5
   bzip2/1.0.8            freetype/2.10.1    kbproto/1.0.7           libjpeg-turbo/2.0.4     libxau/1.0.8      opari2/2.0.5       pcre/8.44        qhull/2020.1            tar/1.32              xz/5.2.5
   cmake/3.18.4           gdbm/1.18.1        libbsd/0.10.0           libpng/1.6.37           libxdmcp/1.1.2    openblas/0.3.12    perl/5.32.0      randrproto/1.5.0        util-macros/1.19.1    zlib/1.2.11
   cubelib/4.5            gettext/0.21       libedit/3.1-20191231    libpthread-stubs/0.4    libxml2/2.9.10    openmpi/3.1.6      pkgconf/1.7.3    readline/8.0            xcb-proto/1.13
   cubew/4.5              glproto/1.4.17     libffi/3.3              libsigsegv/2.12         m4/1.4.18         openssl/1.1.1h     py-pip/20.2      renderproto/0.11.1      xextproto/7.3.0

-------------------------------------------------------------- /home/support/spack/spack-0.16.1/spack/share/spack/lmod/linux-scientific7-x86_64/Core --------------------------------------------------------------
   gcc/0.0.1c    gcc/9.2.0    gcc/9.3.0 (L,D)    intel/19.0.5.281
After doing a module load python, module list will show that the gcc/9.3.0 compiler and python/3.8.6 now available to you.
Getting more information about a module
If you want to display information about what changes a given module makes to your environment, use the module show command. This shows the full PATH to the module, any environment variables it sets or modifies, and any help information which is written into the modulefile.
For example:
$ module show gdal
----------------------------------------------------------------------------------------------------
   /home/support/spack/spack/spack/share/spack/lmod/linux-scientific7-x86_64/gcc/9.3.0/gdal/3.3.3.lua:
----------------------------------------------------------------------------------------------------
whatis("Name : gdal")
whatis("Version : 3.3.3")
whatis("Target : x86_64")
whatis("Short description : GDAL (Geospatial Data Abstraction Library) is a translator library for raster and vector geospatial data formats that is released under an X/MIT style Open Source license by the Open Source Geospatial Foundation. As a library, it presents a single raster abstract data model and vector abstract data model to the calling application for all supported formats. It also comes with a variety of useful command line utilities for data translation and processing. ")
whatis("Configure options : --with-libtiff=/home/support/spack/spack-0.16.1/spack/opt/spack/linux-scientific7-x86_64/gcc-9.3.0/libtiff-4.3.0-2f2cegsk2xoze4l3yvmfpyezcxyx6fa5 --with-geotiff=/home/support/spack/spack-0.16.1/spack/opt/spack/linux-scientific7-x86_64/gcc-9.3.0/libgeotiff-1.6.0-f7bfrcyyiqkydyboefvpmrhcuqjdjvli --with-libjson-c=/home/support/spack/spack-0.16.1/spack/opt/spack/linux-scientific7-x86_64/gcc-9.3.0/json-c-0.15-pnoyfkeirusxfxcqdzqdf7pp5xwiecmr --disable-driver-bsb --disable-driver-mrf --disable-driver-grib --with-proj=/home/support/spack/spack-0.16.1/spack/opt/spack/linux-scientific7-x86_64/gcc-9.3.0/proj-8.1.0-i7esed67zetcgp5e6rueqptkrg6mayum --with-crypto=no --with-qhull=no --with-cryptopp=no --with-kea=no --with-libtool=yes --with-libz=/home/support/spack/spack-0.16.1/spack/opt/spack/linux-scientific7-x86_64/gcc-9.3.0/zlib-1.2.11-vcfrgz7w2a2dhrmrgffjhfp5eccfyypv --with-libiconv-prefix=no --with-liblzma=yes --with-pg=no --with-cfitsio=no --with-png=no --with-jpeg=/home/support/spack/spack-0.16.1/spack/opt/spack/linux-scientific7-x86_64/gcc-9.3.0/libjpeg-turbo-2.1.0-on5bjr4lo24ysffh6nkzmaytcbgw3ysn --with-gif=no --with-sosi=no --with-hdf4=no --with-hdf5=no --with-netcdf=no --with-jasper=no --with-openjpeg=no --with-xerces=no --with-expat=no --with-libkml=no --with-odbc=no --with-curl=no --with-xml2=no --with-sqlite3=no --with-pcre=no --with-geos=no --with-opencl=no --with-poppler=/home/support/spack/spack-0.16.1/spack/opt/spack/linux-scientific7-x86_64/gcc-9.3.0/poppler-21.09.0-x4e25bj4jjmgi64kuorkuczmg5q526si --with-perl=no --with-python=no --with-java=no --with-mdb=no --with-armadillo=no --with-grass=no --with-libgrass=no --with-pcraster=no --with-dds=no --with-gta=no --with-pcidsk=no --with-ogdi=no --with-fme=no --with-fgdb=no --with-ecw=no --with-kakadu=no --with-mrsid=no --with-jp2mrsid=no --with-mrsid_lidar=no --with-msg=no --with-oci=no --with-mysql=no --with-ingres=no --with-dods-root=no --with-spatialite=no --with-idb=no --with-webp=no --with-freexl=no --with-pam=no --with-podofo=no --with-rasdaman=no --with-heif=no --with-exr=no --with-rdb=no --with-tiledb=no --with-mongocxxv3=no --with-jp2lura=no --with-rasterlite2=no --with-teigha=no --with-sfcgal=no --with-mongocxx=no --with-pdfium=no")
help([[GDAL (Geospatial Data Abstraction Library) is a translator library for
raster and vector geospatial data formats that is released under an
X/MIT style Open Source license by the Open Source Geospatial
Foundation. As a library, it presents a single raster abstract data
model and vector abstract data model to the calling application for all
supported formats. It also comes with a variety of useful command line
utilities for data translation and processing.]])
load("libjpeg-turbo/2.1.0")
prepend_path("PATH","/home/support/spack/spack-0.16.1/spack/opt/spack/linux-scientific7-x86_64/gcc-9.3.0/gdal-3.3.3-tzk2vdrdsrgvmtmn55kx7lufrxbp3xd2/bin")
prepend_path("PKG_CONFIG_PATH","/home/support/spack/spack-0.16.1/spack/opt/spack/linux-scientific7-x86_64/gcc-9.3.0/gdal-3.3.3-tzk2vdrdsrgvmtmn55kx7lufrxbp3xd2/lib/pkgconfig")
prepend_path("CMAKE_PREFIX_PATH","/home/support/spack/spack-0.16.1/spack/opt/spack/linux-scientific7-x86_64/gcc-9.3.0/gdal-3.3.3-tzk2vdrdsrgvmtmn55kx7lufrxbp3xd2/")
prepend_path("LD_LIBRARY_PATH","/home/support/spack/spack-0.16.1/spack/opt/spack/linux-scientific7-x86_64/gcc-9.3.0/gdal-3.3.3-tzk2vdrdsrgvmtmn55kx7lufrxbp3xd2/lib")
setenv("PROJ_LIB","/home/support/spack/spack-0.16.1/spack/opt/spack/linux-scientific7-x86_64/gcc-9.3.0/proj-8.1.0-i7esed67zetcgp5e6rueqptkrg6mayum/share/proj")
prepend_path("PYTHONPATH","/home/support/spack/spack-0.16.1/spack/opt/spack/linux-scientific7-x86_64/gcc-9.3.0/gdal-3.3.3-tzk2vdrdsrgvmtmn55kx7lufrxbp3xd2/lib/python3.8/site-packages")
prepend_path("XLOCALEDIR","/home/support/spack/spack-0.16.1/spack/opt/spack/linux-scientific7-x86_64/gcc-9.3.0/libx11-1.7.0-q4wklnu3m6otrajxi6bkvy7jpuj7df75/share/X11/locale")
prepend_path("LD_LIBRARY_PATH","/home/support/spack/spack-0.16.1/spack/opt/spack/linux-scientific7-x86_64/gcc-9.3.0/json-c-0.15-pnoyfkeirusxfxcqdzqdf7pp5xwiecmr/lib64:/home/support/spack/spack-0.16.1/spack/opt/spack/linux-scientific7-x86_64/gcc-9.3.0/libgeotiff-1.6.0-f7bfrcyyiqkydyboefvpmrhcuqjdjvli/lib:/home/support/spack/spack-0.16.1/spack/opt/spack/linux-scientific7-x86_64/gcc-9.3.0/libjpeg-turbo-2.1.0-on5bjr4lo24ysffh6nkzmaytcbgw3ysn/lib64:/home/support/spack/spack-0.16.1/spack/opt/spack/linux-scientific7-x86_64/gcc-9.3.0/libtiff-4.3.0-2f2cegsk2xoze4l3yvmfpyezcxyx6fa5/lib:/home/support/spack/spack-0.16.1/spack/opt/spack/linux-scientific7-x86_64/gcc-9.3.0/poppler-21.09.0-x4e25bj4jjmgi64kuorkuczmg5q526si/lib64:/home/support/spack/spack-0.16.1/spack/opt/spack/linux-scientific7-x86_64/gcc-9.3.0/proj-8.1.0-i7esed67zetcgp5e6rueqptkrg6mayum/lib:/home/support/spack/spack-0.16.1/spack/opt/spack/linux-scientific7-x86_64/gcc-9.3.0/xz-5.2.5-6kpkilinsglwu7b4cojfzfhb47ahlfw6/lib:/home/support/spack/spack-0.16.1/spack/opt/spack/linux-scientific7-x86_64/gcc-9.3.0/zlib-1.2.11-vcfrgz7w2a2dhrmrgffjhfp5eccfyypv/lib")
setenv("GDAL_ROOT","/home/support/spack/spack-0.16.1/spack/opt/spack/linux-scientific7-x86_64/gcc-9.3.0/gdal-3.3.3-tzk2vdrdsrgvmtmn55kx7lufrxbp3xd2")
External Documentation
For more in-depth details on Lmod refer to the online documentation:
-
User Guide: https://lmod.readthedocs.io/en/latest/010_user.html
-
Main documentation: https://lmod.readthedocs.io/en/latest/index.html
Hierarchical List of Available Modules
Our module system uses a hierarchical approach in the provision of modules.
The idea is that when you run module avail initially, it shows you the top level list of module tree's that are available. To then see what application and library modules, etc., are available, you must load at least one of the top level tree's.
We have folded thee modules into gcc, intel and apps sub-trees.
To see the full list of applications are available, you must first run the following:
$> module purge
$> module load apps
$> module avail

$> module purge
$> module load gcc
$> module avail

$> module purge
$> module load intel
$> module avail

$> module purge
$> module load gcc apps
$> module avail
Instructions for certain software usage
Anaconda3
Anaconda provides Python and a long list of packages as well as Jupyter and environment and package manager conda and pip. Anaconda brings a long list of Python packages. You can list them using:
$> conda list
Anaconda3 - Prequisites
Anaconda3 is currently available on Callan and Neuro clusters. Before using conda you must first load the respective modules.
Callan:
$> module load anaconda3-2024.02-1
Neuro:
$> module load apps anaconda3/2022.10
Anaconda3 - Installing Packages
To install packages with Anaconda3 you can use either conda or pip:
$> conda install numpy
# [or](#or)
$> python3 -m pip3 install numpy
Anaconda3 - conda
When using conda it may complain about:
CommandNotFoundError: Your shell has not been properly configured to use 'conda activate'.
To initialize your shell, run
    $ conda init <SHELL_NAME>
Currently supported shells are:
  - bash
  - fish
  - tcsh
  - xonsh
  - zsh
  - powershell
See 'conda init --help' for more information and options.
IMPORTANT: You may need to close and restart your shell after running 'conda init'
Please do not run conda init. This would make changes to your ${HOME}/.bashrc file. Instead initialize the conda environment using:
> module load apps anaconda3
> eval "$(conda shell.bash hook)"
This should also be used in your batch submission scripts when working with conda environments.
Anaconda3 - conda environments
By default your conda environments are stored in ${HOME}/.conda directory. This can be changed using $CONDA_ENVS_PATH.
> export CONDA_ENVS_PATH=/path/to/conda/envs/
> module load apps anaconda3
> eval "$(conda shell.bash hook)"
> conda info --envs
> conda activate myenv
Python
This page will show a basic example of running a serial Python script on the cluster.
See the following page if you need to run multiple scripts together in task-farming.
See the following page for more details on Python Virtual Environments.
Using Python 3
If you need version 3.7 or newer, then see the use the environment modules to load a more recent version. See the module load line in the following example.
#!/bin/sh
#SBATCH -n 1
#SBATCH -t 02:30:00  # 2 hours and 30 minutes
#SBATCH -p compute   # partition name
#SBATCH -J python_job # sensible name for the job

# [Load the modules - We need Python 3.7](#load-the-modules-we-need-python-37)
module load gcc python/3.8.6

# [execute the commands via the slurm task farm wrapper](#execute-the-commands-via-the-slurm-task-farm-wrapper)
python my_script.py optional_arg1 optional_arg2
Installing pip packages
To be able to install python packages with pip use the --user flag. By default pip will try to install to system locations you don't have access to. Here is a full example to intall the tables python package with python 3.
> module load gcc python/3.11.6-gcc-13.1.0-rri7oiq py-pip/23.1.2-gcc-13.1.0-k6tgxbx
> pip install --user tables
If you need to use different python versions please load those from the modules system.
Python Virtual Environments
Please see https://docs.python-guide.org/dev/virtualenvs/ for more information. That source describes Virtual Environments as:
A Virtual Environment is a tool to keep the dependencies required by different projects in separate places, by creating virtual Python environments for them.
Using Python Virtual Environments
Python3
For Python 3.6, virtualenv is already included in Python default installation.
In order to create a new virtual environment
$> module load gcc python/3.11.6-gcc-13.1.0-rri7oiq
Once the required modules are loaded
$> python3 -m venv myenv
In this case, the virtual environment will be created in myenv folder
Once the environment is ready, to enabling it
$> source myenv/bin/activate

(myenv) $>
Note the prompt has changed and now it shows our virtual environment's name
(myenv) $> which python3
~/myenv/bin/python3
(myenv) $> which pip3
~/myenv/bin/pip3
Once you're done with it, to disabling it and going back to the system path
(myenv) $> deactivate
The virtual environment is no longer active and the prompt is back to system one.
Note, you can specify a different python installation with the -p flag, e.g.
$> virtualenv -p /home/support/spack/spack/spack/opt/spack/linux-scientific7-x86_64/gcc-9.3.0/python-3.8.6-uxhy62i3k3suebhxnyals4277wxcmsmq/bin/python3 WASP
Fluent
Prerequisites - getting access to Fluent
Fluent (version 6.3.26) is installed and available on the IITAC and Parsons clusters. To use Fluent, you must first apply for an account on one of these machines.
Before you run Fluent, you must ensure that the fluent module is loaded in your environment settings. To add the fluent module to your environment, run the command:
module load apps fluent
You can also add this line to your ~/.bashrc file which will automatically load fluent next time you log in.
Licenses - Fair Usage Policy
There are a limited number of Fluent licenses, at present there are 16. A fair usage policy applies to these use of these licenses and no one users should check out more than 4 licenses at any time. It is important to note that College holds an academic license for Fluent. If you wish to carry out commercial work using the software you must contact the Centre to commence a process and obtain an appropriate license.
How do I run Fluent on Research IT systems
Fluent can be run in either interactive mode or batch more. In interactive mode, you open an X terminal and run a user driven simulation using the Fluent GUI, much as you would run Fluent from your Desktop. In batch mode, you set up a fluent journal file and run a batch driven simulation.
-
To find out more about running interactive GUI jobs see here.
-
To find out more about running batch jobs see here.
Running Fluent Interactively from Windows
Once you have followed the instructions here, you should be logged into one of the compute nodes (e.g. 'kelvin-n143').
Now, run the following to start fluent:
[neil@kelvin-n143 ~]$ module load apps fluent
[neil@kelvin-n143 ~]$ fluent
Batch processing
To run Fluent in batch mode, you need to decide what compute resources you require and set up a journal file with all the commands needed for Fluent to run.
Example:
Joe has set up a 3D Fluent model to simulate steady state airflow over an aircraft wing on his Desktop. He has read in a mesh file "aircraft.msh", selected appropriate materials, specified initial and boundary conditions, a solver, etc., and initialised the problem. He has then saved a case and data file of his complete setup as "aircraft.cas" and "aircraft.dat".
Joe wants to iterate until his model converges to steady state airflow. From past experience, he predicts that this simulation can be performed without human intervention, and he estimates that it will take 800 iterations to converge. However, Joe also knows that there is a possibility that the problem will not converge in 800 iterations, and that it may need some human intervention to, say, refine selected cells if the gradient of variables in some regions are too high.
So, Joe decides to iterate for 1000 steps and save the output of the iteration every 250 steps. If the simulation fails to converge, Joe will be able to compare the residuals after 250, 500, 750 and 1000 steps, pick the most advantageous one, and carry out any adjustments necessary to ensure future convergence.
Fluent Journal Script
Joe's Fluent journal script (e.g. "journalfile.jou") might look like this:
file/read-case-data aircraft.cas
it 250
wcd "aircraft250.cas"
it 250
wcd "aircraft500.cas"
it 250
wcd "aircraft750.cas"
it 250
wcd "aircraft1000.cas"
Submitting a Batch Fluent Job to Slurm
With the correct journal file set up, the final step is to submit this to the Slurm queuing system.
This will involve creating a Slurm batch file like the following:
#!/bin/sh
#SBATCH -n 1            # 1 core
#SBATCH -t 1-03:00:00   # 1 day and 3 hours
#SBATCH -p compute      # partition name
#SBATCH -J fluent_batch # sensible name for the job

# [load the relevant module files. NB: if unsure about](#load-the-relevant-module-files-nb-if-unsure-about)
# [what you need, please contact ops](#what-you-need-please-contact-ops)
module load apps fluent

# [run slurm in batch on the allocated node(s)](#run-slurm-in-batch-on-the-allocated-nodes)
# [the '-t4' specifies 4 cores (academic licensing)](#the-t4-specifies-4-cores-academic-licensing)
fluent 2d -g -t4 -i journalfile.jou > outputfile.out
The fluent options in the above Slurm script are:
2d- the fluent version used-g- no graphical environment-i- journalfile.jou read the journal file provided
Running fluent in parallel
Example submission script:
#!/bin/sh
#SBATCH -n 16           # cores
#SBATCH -t 1-00:00:00     # 1 day walltime
#SBATCH -p compute      # partition name
#SBATCH -J paraFluent    # sensible name for the job

# [load the relevant module files](#load-the-relevant-module-files)
module load gcc apps fluent openmpi

FLUENTNODES="$(scontrol show hostnames)"
echo $FLUENTNODES

fluent 3ddp -t 16 -mpi=intel -ssh -pinfiniband -cnf=$FLUENTNODES -g -i test.jou > output.`date '+%F_%H-%M-%S'`
Notes on the example script:
-
In order for MPI to work the
openmpimodule or similar are required and must be loaded in the batch script -
-t 16specifies 16 cores -
-mpi=intelensures the correct mpi is used -
-sshforces fluent to use ssh instead of rsh which isn't available -
-cnf=$FLUENTNODES- fluent requires a hosts list, which can be acquired from the slurm environment.
FreeSurfer
FreeSurfer is a set of automated tools for the reconstruction of the brain's cortical surface from structural MRI data, and overlay of functional MRI data onto the ronconstructed surface.
FreeSurfer on Research IT Clusters
Before running FreeSurfer on our TCHPC clusters, please become familiar with the methods for connecting to our systems, and for transferring files.
Loading the FreeSurfer Environment
A module file has been created to set up your environment for FreeSurfer
module load apps freesurfer
The SUBJECTS_DIR variable
FreeSurfer requires a special environment variable to tell it where the subject data is kept. This may be different for each user, and can be set with the following command :
export SUBJECTS_DIR=[path to your subjects]
For example
export SUBJECTS_DIR=/home/users/neil/freesurfer/my_subjects
Batch analysis
For lengthy and intensive analysis it is preferable to use the batch submission system. This will add your analysis job to the queue, and when the resources are available, the job will be executed on a dedicated cluster node. You will receive an email update on the job status.
Each job will require a 'batch' submission file. An example is given here for the batch submission of a FreeSurfer job :
#!/bin/bash
# [-- Request ONE node in the cluster](#-request-one-node-in-the-cluster)
#SBATCH -N 1

# [-- Request a node in the 'compute' partition](#-request-a-node-in-the-compute-partition)
#SBATCH -p compute

# [-- Request 96 hours of time](#-request-96-hours-of-time)
#SBATCH -t 96:00:00

# [-- Give the job a name for identification](#-give-the-job-a-name-for-identification)
#SBATCCH -J FS_Subject_1

# [-- Optional: Ask for an email at beginning and end of job](#-optional-ask-for-an-email-at-beginning-and-end-of-job)
#SBATCH --mail-type ALL

# [-- Optional: Send the email to](#-optional-send-the-email-to)
#SBATCH --mail-user your@email.address

# [-- Now we can run the commands we would like.](#-now-we-can-run-the-commands-we-would-like)
# [-- Set the SUBJECTS_DIR variable](#-set-the-subjectsdir-variable)
export SUBJECTS_DIR=/home/trhpc/neil/freesurfer/my_subjects/

# [-- Load the correct modules](#-load-the-correct-modules)
module load apps freesurfer

# [-- Run the FreeSurfer job](#-run-the-freesurfer-job)
# [-- In this example, subject 'bert', all recon stages.](#-in-this-example-subject-bert-all-recon-stages)
recon-all -subjid bert -autorecon-all
Save this file as myjob.sh.
Submit the job to the queue with the following command :
sbatch myjob.sh
Your job is now in the queue and will run when the necessary resources are available. You will receive an email when the job starts, and again on completion.
Job output
Each job submitted to the batch queue is given an ID number. The output from the job will be placed in a file named slurm-NNN.out (where NNN is the job ID).
GAMESS
General Atomic and Molecular Electronic Structure System (GAMESS) is a general ab initio quantum chemistry package.
GAMESS is available on the Research IT clusters (parsons and kelvin).
License Agreement
Please note that all users of GAMESS must read and adhere to the license agreement.
Loading the module
To enable GAMESS in your path, run the following:
module load apps gamess
Submitting a GAMESS job
The following SLURM script can be used to submit a GAMESS job on parsons or kelvin.
#!/bin/sh
#SBATCH -n 16
#SBATCH -t 00:10:00
#SBATCH -p compute
#SBATCH -J gamess_test

module load apps gamess

cd my_gamess_input_directory

# [execute gamess with the following input file](#execute-gamess-with-the-following-input-file)
rungms.slurm exam20.inp
Note in particular that we have provided a rungms.slurm script for running GAMESS, rather than the default rungms script.
Gaussian
Gaussian is a computational chemistry suite of programs used for electronic structure modelling. Gaussian is named after the type of orbitals used to speed up Hartree-Fock calculations - Gaussian orbitals rather than Slater-type orbitals. The software uses ab initio calculations to predict the energy, molecular structure, vibrational frequencies, and molecular properties of molecules and reactions in a variety of chemical environments. Key features of the software include investigations of molecules and reactions, predicting and interpreting spectra, and exploring diverse chemical arena.
Gaussian G09 and G16 versions are currently available.The software runs in serial and in parallel. See here for the documentation for Gaussian09 and Gaussian16.
The Gaussian software has been installed on the Dalton cluster.
Parallelism with Gaussian
Please note that the version available on TCHPC Systems does not have the Linda parallelisation component. Parallel performance is however available within a single node, using the %NProcShared parameter in the Gaussian input file.
For example, Kelvin has 4-core nodes, so add the following line to the top of your input file:
%NProcShared=4
Licenses
A license is required to run Gaussian. The current TCD Gaussian licenses have been kindly provided by the Department of Chemistry.
Please note however that due to license restrictions, only groups which have purchased licenses are permitted to run Gaussian. If you have licenses for Gaussian and would like to discuss installing them on the TCHPC clusters, or, if you'd like to gain access to Gaussian, please contact us to discuss it.
How do I access the clusters?
-
For Kelvin, ssh to kelvin.tchpc.tcd.ie.
-
For users with access to Dalton, ssh to dalton.tchpc.tcd.ie.
See here for more details on Logging In.
How do I run the Gaussian software?
Gaussian is part of the module system (see Environment Modules).
So you would run:
module load apps gaussian/g16
To add it to your environment, or alternatively add that line to your ~/.bashrc to make sure that it is always loaded.
As noted above, the module load apps gaussian/g16 line will fail if you are not in the correct group and do not have access to licenses.
Running via the batch system
You can run Gaussian through the queuing system either interactively or in batch. The batch system is recommended for long simulations, while the interactive session is useful for debugging and short runs.
Interactive mode
Firstly, get an allocation:
salloc -N 1 -p compute -t 01:00:00
You will have to adjust the parameters above to suit, in particular you will need to use the correct project_name for your group.
Then, launch Gaussian as follows:
srun g16 < input > output
Batch mode
For this, you will need a submission script such as:
#!/bin/sh
#SBATCH -N 1
#SBATCH -t 01:00:00
#SBATCH -p compute
#SBATCH -J job_name

module load apps gaussian/g16
g16 < input > output
Matlab
College has a site license for Matlab.
Running Matlab Interactively
There are a number of versions of Matlab installed on the TCHPC clusters.
To run Matlab interactively on the TCHPC clusters, you must:
-
E.g. Request a single node allocation for 4 hours:
salloc -N 1 -p compute -t 04:00:00 -
Connect to the node that you have been allocated:
ssh $SLURM_NODELIST -
If you wish to use the Matlab GUI, add flag for X11 forwarding
ssh -X $SLURM_NODELIST -
Load the Matlab module:
module load apps matlab
- Run the Matlab programme:
matlab
Running Matlab through the Batch System
To submit a batch Matlab job on the TCHPC clusters, you must:
-
Create a text file containing the commands you wish to run, e.g.
test.m(see below for an example). -
The
.mMatlab file must includeexit;as the last line, to make sure that Matlab exits correctly. -
Create a SLURM batch submission script (see below for an example)
-
Submit it to the queue.
-
When the job has finished, check the output.
Sample Matlab File
This file (for example called test.m) simply creates a matrix and prints it out.
% comments in the Matlab file start with a percent sign

% create the matrix
A = rand(4,4);

% print it out
A

% NB: include this line at the end
exit;
Sample SLURM Script
This file (for example called matlab.sh) loads the relevant modules, calls Matlab with the given instructions.
#!/bin/bash
#SBATCH -n 1 # number of cores
#SBATCH -p compute # compute queue
#SBATCH -t 00:10:00 # time (ddd-hh:mm:ss)
#SBATCH -J matlab # job name

# [load up the correct modules](#load-up-the-correct-modules)

module load apps matlab

# [call matlab non-interactively](#call-matlab-non-interactively)

matlab -nodisplay < test.m
Submit the slurm sbatch script to the queue
Once you have created that batch file on the system, you will need to log in to the command-line, and run the following command to submit to the queuing system:
sbatch test.sh
Alternatives to Matlab
There are a few free and open-source alternatives to Matlab such as Scilab and Octave. These programs are available on a selection of the machines that TCHPC maintain.
Adding additional folders/directories to the Matlab PATH
There are two ways to permanently add folders to the Matlab PATH on a Unix system:
-
Create a file called
startup.min your home directory, and add folders using theaddpathcommand. For example:addpath /home/users/myusername/mytools -
Set the environment variable
MATLABPATHin your~/.bashrcfile. For example (assuming the bash shell):export MATLABPATH=/home/users/myusername/mytools
Note: if you just wish to add a folder as a once-off, you can just call the addpath /home/users/myusername/mytools function from within Matlab.
Sources:
NWChem
Performance Tuning NWChem
NWChem is known to have I/O performance issues, in particular when run on a network file system (such as GPFS or NFS).
The pattern of I/O seems to be to write a number of (small) files, and then re-read them repeatedly. It appears to be the repeated reading of these small files which causes an I/O bottleneck on our GPFS network file system.
We have found that setting NWChem to use a local scratch disk greatly improved the I/O performance, and the overall performance of NWChem. The setting is as follows:
scratch_dir /tmp
Other performance tips can be found here.
Star-P
Star-P is a client-server parallel-computing platform that allows Very High Level Language (VHLL) clients to transparently use high performance computing resources. Familiar clients, such as MATLAB and Python, can harness parallel computing facilities in a seamless fashion. For more, see here.
Note: a local version of the old ISC documentation is attached below.
Access
How to access to the Star-P facilities is dependant on the Language (VHLL) that you are using. There are currently two well supported options.
-
MATLAB
-
Python
Python
Use SSH to access the server kelvin.tchpc.tcd.ie.
ssh username@kelvin.tchpc.tcd.ie
Load the necessary starp/python/2.5.1 environment module:
module load apps starp/python/2.5.1
Start Python:
python
Python 2.5.1 (r251:54863, Dec 11 2008, 17:17:33)
[GCC 4.1.1 20070105 (Red Hat 4.1.1-51)] on linux2
Type "help", "copyright", "credits" or "license" for more information.
>>>
Import the starp library into Python
>>> import starp
>>>
Connect the the HPC server with
>>> starp.defaultConnect('kelvin01.tchpc.tcd.ie','/home/support/apps/apps/starp/2.7.0',num_procs=16)
>>>
In this case we are asking for 16 processors (cores). With 8 cores per node, this will request 2 nodes.
ISC_Programming_Guide_StarPwithMATLAB.pdf
Stata
Stata is a general-purpose statistical software package developed by StataCorp for data manipulation, visualization, statistics, and automated reporting. It is used by researchers in many fields, including biomedicine, epidemiology, sociology and science. The software can be run on multicore processors.
Running Stata in Batch Jobs
Rather than typing Stata commands in the interactive shell, you can create a text file/script containing commands and instruct Stata to execute the commands stored in that file. Such files are known as 'do-files'. Read more about do-files and running in batch mode.
Example, create file myjob.do with contents:
// Stata version this do-file was created for version 17
use /home/support/pkgs/stata/17/examples/data/r17/census2.dta
tabulate region
summarize marriage divorce medage if state!="Nevada"
Then you can execute your do-file in a batch file using:
module load apps stata/17
cd /path/to/dofile/
stata -b do myjob.do
Running Stata in Interactive Jobs
If you will be using the Stata graphical user interface please make sure you have the necessary setup done.
If you need to transfer Stata files or data to the clusters use the transferring files instructions.
-
E.g. Request a single node allocation for 4 hours:
salloc -N 1 -p compute -t 04:00:00 -
Connect to node that you have been allocated:
ssh -X $SLURM_JOB_NODELIST -
Load the required Stata module:
module load apps stata -
Run the Stata program:
xstata-se
R
R is a free software environment for statistical computing and graphics. It compiles and runs on a wide variety of UNIX platforms, Windows and MacOS.
Running R Interactively
There are a number of versions of R installed on the TCHPC clusters. To run R interactively on the TCHPC clusters, you must:
-
E.g. Request a single node allocation for 4 hours:
salloc -N 1 -p compute -t 04:00:00 -
Connect to the node that you have been allocated:
ssh $SLURM_NODELIST -
Load the R module:
module load gcc/9.3.0 r/4.0.3
- Open the R programme with the command
R - Note the R command terminal is prefixed by an
>symbol
Running R Through the Batch System
To submit a batch R job on the TCHPC clusters, you must:
- Create a text file containing the commands you wish to run, e.g.
test.r(see below for an example).
# [comments in R start with a hash sign](#comments-in-r-start-with-a-hash-sign)
helloWorld <- function(){
  print("Hello World!")
}

helloWorld()
- Create a SLURM batch submission script (see below for an example
rscript_sub.sh)
#!/bin/bash
#SBATCH -n 1 # number of cores
#SBATCH -p compute # compute queue
#SBATCH -t 00:10:00 # time (ddd-hh:mm:ss)
#SBATCH -J Rscript  # job name

# [load up the correct modules](#load-up-the-correct-modules)
module load gcc/9.3.0 r/4.0.3

# [call Rscript to run script non-interactively](#call-rscript-to-run-script-non-interactively)
Rscript test.r
-
Submit it to the queue with command
sbatch rscript_sub.sh -
When the job has finished, check the output.
Installing R Packages via r_downloadpackages module
Users often have memory issues when installing larger R packages using install.packages() from the head node of clusters. For example error:
Error: Ran out of virtual memory.
The r_downloadpackages module is available on Kelvin.
The modules allows a new workflow for installing packages from compute nodes.
This involves downloading packages and dependencies on the head node (which has internet access), and installing said packages from compute nodes (which do not have internet access).
Usage:
1. On head node:
# [Load desired R module](#load-desired-r-module)
# [eg module load gcc/9.3.0 r/4.0.3](#eg-module-load-gcc930-r403)

# [Load r_downloadpackages module](#load-rdownloadpackages-module)
module load apps r_downloadpackages/0.0.1

# [Run download script for given package name, eg rstan](#run-download-script-for-given-package-name-eg-rstan)
r_download_package rstan
2. On compute node (via slurm batch or interactive session):
# [Load desired R module](#load-desired-r-module)
# [eg module load gcc/9.3.0 r/4.0.3](#eg-module-load-gcc930-r403)

# [Load r_downloadpackages module](#load-rdownloadpackages-module)
module load apps r_downloadpackages/0.0.1

# [Run install script for same package, eg rstan](#run-install-script-for-same-package-eg-rstan)
r_install_package rstan
3. If the package install is successful then you can clean up the source files with:
r_clean_package
VASP
VASP is a computational chemistry/physics package used for performing ab-initio quantum-mechanical molecular dynamics simulations using pseudopotentials or the projector-augmented wave method with a plane wave basis set. VASP is based on an implementation of the finite-temperature local-density approximation with the free energy as a variational quantity and with an exact evaluation of the instantaneous electronic ground state at each molecular dynamics time step. The software can be run in parallel.
There is a user guide and material from talks and a set of "hands on" sessions is available here.
Running VASP on Research IT systems
Licenses:
VASP is only available to researchers through a group license. If you do not have access to a group license, or if you are unsure if you have access to a group license, please contact us.
Inputs
VASP requires four input files to run, these are an INCAR, POTCAR, POSCAR, and the KPOINTS: the INCAR file specifies the set of operations for VASP to perform; the POTCAR file contains information about the atoms in the system and the pseudopotentials; the POSCAR file contains the position of ions in the system; and the KPOINTS file specifies the k-point settings.
How do I run VASP?
Research IT do not have a centrally installed VASP compilation. We recommend that you check with your colleagues for a pre-compiled version.
VASP can be run in both interactive and batch mode, however, we recommend users run interactive jobs on their Desktop and batch mode on our systems. For more information on running jobs in batch mode please read our section on the Slurm Resource Manager.
A example Slurm input script for VASP is as follows, (please note, that this is an example only and not guaranteed to work in all circumstances).
#!/bin/sh

#SBATCH -n 32
#SBATCH -t 96:00:00
#SBATCH -p queue_name
#SBATCH -J job_name
srun hostname

module load intel/19.0.5.281

# [Have a look at the SLURM environment](#have-a-look-at-the-slurm-environment)
env | grep SLURM

# [Set the stack size to unlimited.](#set-the-stack-size-to-unlimited)
ulimit -s unlimited

mpirun /path_to_executable > out

echo 'done'
Apptainer
Due to security concerns HPC sites typically don’t allow users to run Docker containers. An alternative is Apptainer, which is an open source container platform. Apptainer is designed for ease-of-use on shared systems and in high performance computing (HPC) environments.
As of March 2025 Apptainer is available on the Callan HPC Cluster.
Some Apptainer examples
apptainer exec
Run a command in a container
apptainer exec docker://alpine cat /etc/alpine-release
Build a container
(1) Write build file, e.g.
$ cat ubuntuBuild
Bootstrap: docker
From: ubuntu:20.04

%post
    apt-get -y update
    apt-get -y install fortune cowsay lolcat

%environment
    export LC_ALL=C
    export PATH=/usr/games:$PATH

%runscript
    fortune | cowsay | lolcat
(2) Build:
apptainer build myOwn.img ubuntuBuild
Creates the myOwn.img image
Apptainer defaults to creating images in SIF format, which is read only. To create a writable image, there are two options.
1. An image could be created as writeable:
apptainer build --writable myImg.img myrecipeFile
2. Or, an image could be created as a sandbox directory:
apptainer build --sandbox myImg.img myrecipeFile
apptainer shell
Get a shell on a container image
apptainer shell myOwn.img
apptainer run
Execute the runscript of the container. Requires a runscript definition within the build file of the container.
apptainer run myOwn.img
runscript
The contents of the %runscript section are written to a dedicated file within the container that is executed when the container image is run, as per. E.g.
%runscript
    ${HOME}/apptainer/hello-world
(2)
%runscript
    fortune | cowsay | lolcat
%runscript
    echo "Container was created $NOW"
    echo "Arguments received: $*"
    exec echo "$@"
Slurm batch apptainer example
Definition file:
$ cat tools.def
Bootstrap: docker
From: ubuntu:20.04
%post
    apt -y update
    apt -y install curl git
Build it:
$ apptainer build --fakeroot /tmp/tools.sif ./tools.def
# [Or without fake root](#or-without-fake-root)
$ apptainer build tools.sif tools.def
Slurm batch file:
$ cat test-apptainer-batch.sh
#!/bin/bash
#SBATCH -N 1
date
hostname
apptainer --version
apptainer exec tools.sif git --version
Submit it to the queue: sbatch test-apptainer-batch.sh
udocker
udocker is a "basic user tool to execute simple docker containers in user space without requiring root privileges". Which "Enables download and execution of docker containers by non-privileged users in Linux systems where docker is not available".
Hence, it may be of use on our systems to run some docker containers without having to request support from the systems team.
Please see the udocker homepage for more information.
Support for udocker from Research IT
udocker is an open source project provided without support from the developers. Research IT staff are not experts in its operation. Accordingly udocker is provided "as is" and without any assurances of support from Research IT. If you have questions
or problems please get in contact but any help we can offer may be limited or effectively null.
Using udocker
Install udocker to your home directory
This is a necessary step in order to use udocker.
> git clone https://github.com/indigo-dc/udocker
> cd udocker/
> ./udocker.py install
> ln -s udocker.py ~/bin/udocker
udocker usage
> udocker help
Example: udocker slurm submission script
#!/bin/sh
#SBATCH -n 8            # 8 cores
#SBATCH -t 1-03:00:00   # 1 day and 3 hours
#SBATCH -p compute      # partition name
#SBATCH -J my_job_name  # sensible name for the job

udocker run --user={your-username} --bindhome {your-container-name} bash -c date >> {your-home-directory}/container-date.txt
Example: udocker slurm submission. Python script
In this example we're going to submit a Python script that will run inside the udocker container.
We have a udocker container named PySCIPOpt with the PySCIPOpt Python library installed.
$ udocker ps
CONTAINER ID                         P M NAMES              IMAGE
df4a31b0-4c82-34b9-9ab6-1f6cfb3f336e . W ['PySCIPOpt', 'fedora25'] fedora:25
The slurm description file would look similar to this
#!/bin/sh
#SBATCH -n 8            # 8 cores
#SBATCH -t 1-03:00:00   # 1 day and 3 hours
#SBATCH -p compute      # partition name
#SBATCH -J my_job_name  # sensible name for the job


udocker run --user=$(whoami) --bindhome PySCIPOpt python $HOME/slurm/my_python_script.py >> $HOME/slurm/my_python_script.out 2>&1
As you can see, the first 5 lines are slurm parameters as usual.
The last line is where we run the udocker container passing our Python script as argument.
In this case, the Python script is in $HOME/slurm folder and the output will be stored in $HOME/slurm/my_python_script.out file.
Example: Open Foam container
> udocker pull openfoam/openfoam5-paraview54
> udocker run --name=openfoam openfoam/openfoam5-paraview54
Example: build a tensorflow, (cpu version), container with udocker
$ udocker pull ubuntu:22.04
$ udocker create --name=tfcon ubuntu:22.04
$ udocker run tfcon bash
# [apt update && apt install -y gcc kmod perl python3 python3-pip](#apt-update-apt-install-y-gcc-kmod-perl-python3-python3-pip)
# [pip3 install tensorflow==1.5](#pip3-install-tensorflow15)
# [python3](#python3)
>>> import tensorflow as tf
Example: RABIES docker container usage
RABIES uses docker containers for installation. Here are some example notes.
Setup, only needs to be done once, the container should then be available for you on the clusters. Please note that the container is very large.
-
Pull the container image:
udocker pull gabdesgreg/rabies -
Create the container:
udocker create --name=rabid1 gabdesgreg/rabies
Usage: udocker run rabies -h
E.g. run the pre-process steps, binding parts of the local file system to the container file system using multiple cores as determined by slurm.
udocker run -v /tmp/bids_dir:/tmp/bids_dir -v /tmp/output_dir:/tmp/output_dir rabies -p SLURM preprocess /tmp/bids_dir /tmp/output_dir
Some known issues and limitations
TensorFlow won't launch and errors as follows and has been reported to the TensorFlow developers.
$ udocker run tfcon bash
# [pip3 install tensorflow](#pip3-install-tensorflow)
# [python3](#python3)
>>> import tensorflow
Illegal instruction
The workaround is to downgrade, (in the "tfcon" container created above), to tensorflow version 1.5 as per this source:
# [pip3 uninstall tensorflow](#pip3-uninstall-tensorflow)
Proceed (y/n)? y
# [pip3 install tensorflow==1.5](#pip3-install-tensorflow15)
# [python3](#python3)
>>> import tensorflow as tf
COMSOL
Access / Licenses
Access to the COMSOL package is limited to certain users/groups for licensing reasons. If you require access, or if you have access to a licence, please contact ops@tchpc.tcd.ie.
Using COMSOL
The COMSOL Multiphysics engineering simulation software environment facilitates all steps in the modelling process − defining your geometry, meshing, specifying your physics, solving, and then visualizing your results.
Running COMSOL on the TCHPC clusters is done in batch mode. The generation of models should be done locally on your own desktop. Save your model file (*.mph) and transfer it to the cluster for analysis.
Requirements
- A TCHPC account.
- A resource allocation (project code).
File transfer to the cluster
After you have generated your model file (usually named *.mph) you will need to transfer it to the cluster. Details on the transfer of files to and from our cluster are available here.
You will typically have been assigned a storage area in association with your project id. This would be a good place to store model files and to run the analysis.
Generate a batch submission file
To run your COMSOL job you will need to generate another file know as a "batch submission file". This file will details the resources required for the job, will set up the required environment for the job and, finally, run the job. The batch file is submitted the the queue and run when the resources are available.
Below is a template batch file for Comsol 5.6. It would generally live in the same directory as your *.mph model file.
#!/bin/bash

# [note: for COMSOL, specify the same number for -N and -n](#note-for-comsol-specify-the-same-number-for-n-and-n)
#SBATCH -N2   # 2 nodes
#SBATCH -n2   # 2 COMSOL processes, one per node in this case, each
              # running 8 COMSOL threads; so total of 16 threads


# [Submit to a partition (debug or compute)](#submit-to-a-partition-debug-or-compute)
#SBATCH -p compute

# [Request a run time (max 4days on compute partition)](#request-a-run-time-max-4days-on-compute-partition)
#SBATCH -t 24:00:00

# [optional] Set your email address to be notified of jobs updates
#SBATCH --mail-type=ALL
#SBATCH --mail-user=your@email.address

# [load up the correct modules](#load-up-the-correct-modules)
module load apps comsol/5.6


# [Details of your input and output files](#details-of-your-input-and-output-files)
INPUTFILE=/location/of/my/model.mph
OUTPUTFILE=/location/of/my/output_model.mph


######## [DO NOT EDIT BELOW THIS LINE ########](#do-not-edit-below-this-line-)
# [Run COMSOL in batch mode with the input and output detailed above.](#run-comsol-in-batch-mode-with-the-input-and-output-detailed-above)
comsol -mpibootstrap slurm -mpifabrics dapl batch -inputfile $INPUTFILE -outputfile $OUTPUTFILE
## ^^^ if the above fails with MPI errors, you may need to specify the MPI fabric:[^^^ if the above fails with MPI errors, you may need to specify the MPI fabric:](#-if-the-above-fails-with-mpi-errors-you-may-need-to-specify-the-mpi-fabric)
##comsol -mpibootstrap slurm -mpifabrics dapl batch -inputfile $INPUTFILE -outputfile $OUTPUTFILE
Transfer this file (perhaps named .sbatch to the cluster. Typically is may live in the same location at the *.mph model file.
Submit the job to the queue
You will need to access the cluster via SSH to submit your job.
When you have logged in, do the following :
-
Navigate to the location of the batch file:
cd /projects/location/of/batchfile.sbatch -
Submit the job to the queue:
sbatch batchfile.sbatch
Notes
-
COMSOL5.4 supports Slurm for launching, including support for multiple nodes over MPI. It uses the number of CPU cores available as threads per-process by default (12 on kelvin), so you must specify both
-Nand-nwith the same value, and then it will run a total number of threads equal to that number multiplied by the number of CPU cores per node. -
The older versions 4.2a & 4.4 of COMSOL are still available at
/home/support/apps/apps/comsol42a/COMSOL42a/bin/comsol/home/support/apps/apps/comsol44/COMSOL44/bin/comsol
Lumerical
Lumerical is licensed software that is only available to certain users and groups. If you wish to request access to it please send an email to ops@tchpc.tcd.ie and we will check with the current users of the software if you can be granted access to the license.
Lumerical Usage Notes
Load the module to make it available to you:
- Boyle HPC Cluster:
module load lumerical/R4.1 - Callan HPC Cluster:
module load lumerical_R4.1
To setup the license please run the following command. It only needs to be done once.
- Boyle:
/home/support/apps/apps/lumerical/license-setup.sh - Callan:
/home/support/apps/rhel8/lumerical/license-setup.sh
Check Pointing
Check pointing, (sometimes called check marking), is the practice of saving a snapshot of the application's state, so that applications can restart from that point in the future. The idea being if the application fails or needs to be stopped and restarted by the user. E.g. if it is going to run into its maximum allowed job time.
DMTCP
DMTCP: Distributed MultiThreaded Checkpointing can "transparently checkpoints a single-host or distributed computation in user-space".
Here are some more DMTCP resources:
- Checkpointing: A Simple DMTCP Example from Cornell.
- DMTCP: Distributed MultiThreaded Checkpointing from NERSC.
- DMTCP notes from George Mason University.
MANA
MANA (MPI-Agnostic, Network-Agnostic MPI). MANA is an implementation of transparent checkpointing for MPI. It is built as a plugin on top of DMTCP.
The Scheduler
All our HPC clusters use the Slurm Workload Manager as their scheduler, (resource manager).
Basic Slurm commands
| Command | Details |
|---|---|
sinfo |
show available queues and nodes |
squeue Or smap |
show jobs in the queue |
sbatch |
submit a script |
salloc |
submit an interactive request |
scancel |
delete a job |
Advanced Slurm commands
Display queue/partition names, runtimes and available nodes
[user1@iitac01 ~]$ sinfo
PARTITION AVAIL  TIMELIMIT  NODES  STATE NODELIST
debug*       up    3:00:00      6   idle iitac-n[142,144,167,197,227,259]
serial       up 1-00:00:00      1  alloc iitac-n306
serial       up 1-00:00:00      4   idle iitac-n[086-087,305,328]
compute      up 4-00:00:00      2  down* iitac-n[206,341]
compute      up 4-00:00:00      1  drain iitac-n088
compute      up 4-00:00:00    220  alloc iitac-n[001-004,006-007,009-012,014-016,020-021,023-027,031-032,034-036,038-040,042-044,046-059,061,063-064,067-069,071-075,077-085,089-092,094-096,098-104,106-121,123-124,128-130,181-184,186-189,191-196,198-200,202-204,208-210,217-221,224-226,228-232,234,236-238,240-243,245-246,249-258,260-261,263,265-271,273,275,279,281-284,286-302,304,306,308-312,315-316,318,321-327,329-340,342]
compute      up 4-00:00:00     37   idle iitac-n[131-132,134-141,143,145-148,150-151,153-157,159-160,162-165,171-179]
compute      up 4-00:00:00      2   down iitac-n[233,307]
Display runtimes and available nodes for a particular queue/partition
[user1@iitac01 ~]$ sinfo -p debug
PARTITION AVAIL  TIMELIMIT  NODES  STATE NODELIST
debug*       up    3:00:00      6   idle iitac-n[142,144,167,197,227,259]
Display information about a specific job
[user1@iitac01 ~]$ scontrol show jobid 108
JobId=108 Name=test
   UserId=user1(1351) GroupId=trhpc(3114)
   Priority=1996 Account=root QOS=normal
   JobState=RUNNING Reason=None Dependency=(null)
   TimeLimit=00:10:00 Requeue=1 Restarts=0 BatchFlag=1 ExitCode=0:0
   SubmitTime=2010-07-27T15:57:18 EligibleTime=2010-07-27T15:57:18
   StartTime=2010-07-27T15:57:18 EndTime=2010-07-27T16:07:18
   SuspendTime=None SecsPreSuspend=0
   Partition=debug AllocNode:Sid=iitac01:8389
   ReqNodeList=(null) ExcNodeList=(null)
   NodeList=iitac-n[197,227]
   NumNodes=2 NumCPUs=4 CPUs/Task=1 ReqS:C:T=65534:65534:65534
   MinCPUsNode=1 MinMemoryNode=0 MinTmpDiskNode=0
   Features=(null) Reservation=(null)
   Shared=OK Contiguous=0 Licenses=(null) Network=(null)
   Command=/home/trhpc/user1/job.sh
   WorkDir=/home/trhpc/user1
Display only my jobs in the queue
[user1@iitac01 ~]$ squeue -u user1
  JOBID PARTITION     NAME     USER  ST       TIME  NODES NODELIST(REASON)
    109     debug test-4-c    user1   R       0:01      2 iitac-n[197,227]
Display long output about my jobs in the queue
[user1@iitac01 ~]$ squeue -u user1 -l
Tue Jul 27 16:00:07 2010
  JOBID PARTITION     NAME     USER    STATE       TIME TIMELIMIT  NODES NODELIST(REASON)
    109     debug test-4-c    user1  RUNNING       0:43     10:00      2 iitac-n[197,227]
Display historical information about completed jobs
[user1@iitac01 ~]$ sacct --format=jobid,jobname,account,partition,ntasks,alloccpus,elapsed,state,exitcode -j 66808
       JobID    JobName    Account  Partition   NTasks  AllocCPUS    Elapsed      State ExitCode
------------ --------- ----------- ---------- -------- ---------- ---------- ---------- --------
66808        my_test_j+      acc01    compute                   8   00:02:34  COMPLETED      0:0
66808.batch       batch      acc01                   1          1   00:02:34  COMPLETED      0:0
Display 'graphical' view of SLURM jobs and partitions
Show the info, updating every 2 seconds:
[user1@iitac01 ~]$ smap -i 2
Note: press q to quit out of the smap view.
Full list of SLURM commands
Man pages exist for all SLURM daemons, commands, and API functions. The command option --help also provides a brief summary of options. Note that the command options are all case insensitive.
-
sacctis used to report job or job step accounting information about active or completed jobs. -
sallocis used to allocate resources for a job in real time. Typically this is used to allocate resources and spawn a shell. The shell is then used to execute srun commands to launch parallel tasks. -
sattachis used to attach standard input, output, and error plus signal capabilities to a currently running job or job step. One can attach to and detach from jobs multiple times. -
sbatchis used to submit a job script for later execution. The script will typically contain one or more srun commands to launch parallel tasks. -
sbcastis used to transfer a file from local disk to local disk on the nodes allocated to a job. This can be used to effectively use diskless compute nodes or provide improved performance relative to a shared file system. -
scancelis used to cancel a pending or running job or job step. It can also be used to send an arbitrary signal to all processes associated with a running job or job step. -
scontrolis the administrative tool used to view and/or modify SLURM state. Note that many scontrol commands can only be executed as user root. -
sinforeports the state of partitions and nodes managed by SLURM. It has a wide variety of filtering, sorting, and formatting options. -
smapreports state information for jobs, partitions, and nodes managed by SLURM, but graphically displays the information to reflect network topology. -
squeuereports the state of jobs or job steps. It has a wide variety of filtering, sorting, and formatting options. By default, it reports the running jobs in priority order and then the pending jobs in priority order. -
srunis used to submit a job for execution or initiate job steps in real time. srun has a wide variety of options to specify resource requirements, including: minimum and maximum node count, processor count, specific nodes to use or not use, and specific node characteristics (so much memory, disk space, certain required features, etc.). A job can contain multiple job steps executing sequentially or in parallel on independent or shared nodes within the job's node allocation. -
smapreports state information for jobs, partitions, and nodes managed by SLURM, but graphically displays the information to reflect network topology. -
striggeris used to set, get or view event triggers. Event triggers include things such as nodes going down or jobs approaching their time limit. -
sviewis a graphical user interface to get and update state information for jobs, partitions, and nodes managed by SLURM.
Queueing system priorities
The priority/multifactor priority plugin is used on most of our HPC Clusters to determine scheduling priorities. Please see the Slurm Multifactor Priority Plugin for full details of how that can be configured.
Generally, job priorities are calculated as a weighted average of Age, JobSize and FairShare.
- Age is how long a job has been waiting, the longer a job is waiting the higher its priority value should be.
- To check the weight assigned to the priority calculation by the job age you can use:
scontrol show config | grep -i PriorityWeightAge Jobsizeis the number of cores and nodes being requested for a job, most of our clusters apply a higher scheduling weight for larger jobs to encourage larger, more parallel jobs.- To check the weight assigned to the priority calculation by the job size you can use:
scontrol show config | grep -i PriorityWeightJobSize FairShareis the inverse of usage, so the less you use the cluster the higher your fairshare.- To check the weight assigned to the priority calcualtion by the fairshare you can use:
scontrol show config | grep -i PriorityWeightFairShare
You can list the priority for pending jobs and sort with those with the highest priority at the bottom with:
sprio -l | sort -k3 -n
You can get an idea of when your jobs will start with:
squeue --start -u $(whoami)
Running jobs
Do not run computationally intensive work on the head nodes.
All computationally intensive work must be run through the resource manager, i.e. Slurm.
There are two main types of way to run your jobs.
-
Batch jobs. Where the scheduler allocates the resources and runs the work you specify automatically.
-
Interactive jobs. Where you ask the scheduler for resources then access them yourself and run the work yourself.
Batch jobs
Batch jobs are jobs where the scheduler allocates the resources and runs the work you specify automatically.
E.g. Batch job submission scripts
The following is a typical Slurm submission script.
#!/bin/sh
#SBATCH -n 16           # 16 cores
#SBATCH -t 1-03:00:00   # 1 day and 3 hours
#SBATCH -p compute      # partition name
#SBATCH -J my_job_name  # sensible name for the job


# [load up the correct modules, if required](#load-up-the-correct-modules-if-required)
module load gcc openmpi

# [launch the code](#launch-the-code)
mpirun ./cpi.x
How to submit a job
To submit this, run the following command:
sbatch myscript.sh
Note that this is for OpenMPI compiled applications, for other MPI implementations you may need to adjust the mpirun line. See here for more details.
Warning: do not execute the script
The job submission script file is written to look like a bash shell script. However, you do NOT submit the job to the queue by executing the script.
In particular, the following is INCORRECT:
# [this is the INCORRECT way to submit a job](#this-is-the-incorrect-way-to-submit-a-job)
./myscript.sh  # wrong! this will not submit the job!
The correct way is noted above (sbatch myscript.sh).
Accessing node(s) you have been batch allocated
It is is possible to log into node(s) you have been allocated for a batch job. This may be useful for profiling jobs or checking their progress, etc.
You can only do this when your job is running on the node(s). I.e. if your job has completed or not been run yet you cannot do so.
To access a node or nodes you have been allocated in a batch job:
-
Determine what your job id number is if you don't know it with this command:
squeue -u myuserreplacibg "myuser" with your username. -
Determine what node or nodes you have been allocated with this command:
scontrol show jobid 12345replacing "12345" with the relevant "JOBID" value from the first command. Look for theNodeListorBatchHostvalues. -
SSH into the relevant node(s):
ssh -X nodenamereplacing "nodename" with the relevant value from the second command.
MPI Implementation Differences for Slurm
When submitting jobs to Slurm, there are slight differences depending on which MPI implementation the code was compiled with.
Launching an openmpi compiled binary
#!/bin/sh
#SBATCH -n 16           # 16 cores
#SBATCH -t 1-03:00:00   # 1 day and 3 hours
#SBATCH -p compute      # partition name
#SBATCH -J my_job_name  # sensible name for the job

mpirun ./cpi.x
Launching an mvapich compiled binary
#!/bin/sh
#SBATCH -n 16           # 16 cores
#SBATCH -t 1-03:00:00   # 1 day and 3 hours
#SBATCH -p compute      # partition name
#SBATCH -J my_job_name  # sensible name for the job

srun --mpi=mvapich ./cpi.x
Launching an mvapich2 compiled binary
Before you can launch a mvapich2 job, it must be linked with the slurm pmi library, this can be done by...
mpicc -L/usr/lib64 -lpmi ...
Then the submission script is as follows:
#!/bin/sh
#SBATCH -n 16           # 16 cores
#SBATCH -t 1-03:00:00   # 1 day and 3 hours
#SBATCH -p compute      # partition name
#SBATCH -J my_job_name  # sensible name for the job

srun --mpi=none ./cpi.x
Running Fewer MPI Tasks Than Available Cores
In some edge cases a user may want to only run 1 MPI tasks on a node which contains 8 cores.
Example 1 - use a single core per node:
To do this change your script to the following:
#!/bin/sh
#SBATCH -N 4            # ask for 4 nodes
#SBATCH -n 4            # ask for 4 cores in total (in this case it is ONE core per node)
#SBATCH -t 1-03:00:00   # 1 day and 3 hours
#SBATCH -p compute      # partition name
#SBATCH -J my_job_name  # sensible name for the job

mpirun ./cpi.x
The above assumes that openmpi is being used and will ask for 4 nodes but launch 1 process per node.
Example 2 - use several cores per node:
This might be very useful if you need to use more RAM per core. Example is as follows:
#!/bin/sh
#SBATCH -N 8            # ask for 8 nodes
#SBATCH -n 16           # ask for 16 cores in total (in this case it is TWO cores per node)
#SBATCH -t 1-03:00:00   # 1 day and 3 hours
#SBATCH -p compute      # partition name
#SBATCH -J my_job_name  # sensible name for the job

mpirun ./cpi.x
This gives you 8 nodes and runs 2 mpi process on each node (i.e. 16 mpi processes in total). If you ask half of the cores available on the node they are going to share all the available RAM between themselves, so each core will have effectively double the amount of RAM.
Windows line breaks on linux
Files with windows line breaks can cause issues on linux systems.
You may get an error like the following when trying to submit batch jobs whose submission scripts include windows line breaks:
sbatch: error: Batch script contains DOS line breaks (\r\n)
sbatch: error: instead of expected UNIX line breaks (\n).
To resolve it run the following command where myBatchFile is the name of the submission file.
dos2unix myBatchFile
Interactive jobs
Interactive jobs are jobs where you ask the scheduler for resources then access them yourself and run the work yourself.
Using interactive allocations.
First, login to the cluster head node you wish to run an interactive job on.
E.g. interactive allocation usage:
$: salloc -N 1 -p compute -t 4:00:00
$: ssh -X $SLURM_NODELIST
$: module load apps matlab
In that example we requested an allocation of 1 node with the salloc command, giving the following parameters:
| Flag | Description |
|---|---|
-N 1 |
Request 1 physical node |
-p compute |
Request the 'compute' partition |
-t 4:00:00 |
Request 4 hours of time |
Those flags can be changed to better suite your needs.
In full the salloc -N 1 -p compute -t 4:00:00 command output looks like this:
[neil@kelvin01 ~]$ salloc -N 1 -p compute -t 4:00:00
salloc: Job is in held state, pending scheduler release
salloc: Pending job allocation 10077
salloc: job 10077 queued and waiting for resources
salloc: job 10077 has been allocated resources
salloc: Granted job allocation 10077
<<JOB #10077>> [neil@kelvin01 ~]$
You have now been allocated a single node. This has been placed in the $SLURM_JOB_NODELIST environment variable.
Note that the prompt changes, to include the job id.
You can check which node(s) have been allocated:
<<JOB #10077>> [neil@kelvin01 ~]$ echo $SLURM_JOB_NODELIST
kelvin-n016
You can now ssh (with X forwarding enabled) to the allocated node.
<<JOB #10077>> [neil@kelvin01 ~]$ ssh -X $SLURM_JOB_NODELIST
Last login: Thu Jul 16 13:36:43 2009 from 10.141.255.251
[neil@kelvin-n016 ~]$
Again, note that the prompt changes, this time to reflect that you are now logged into your allocated node, rather than just being logged into the cluster headnode.
Run your GUI application. (e.g. xmgrace, a WYSIWYG 2D plotting tool)
[neil@kelvin-n016 ~]$ module load apps grace
[neil@kelvin-n016 ~]$ xmgrace
Log out or job time-out
Once you have finished running your application, you should log out of the allocated node (type exit), and then finish the allocation (again type exit).
This will free up the resources again for other users of the system.
[neil@kelvin-n016 ~]$ exit
Connection to kelvin-n016 closed.
<<JOB #10077>> [neil@kelvin01 ~]$
<<JOB #10077>> [neil@kelvin01 ~]$ exit
salloc: Relinquishing job allocation 10077
salloc: Job allocation 10077 has been revoked.
[neil@kelvin01 ~]$
[neil@kelvin01 ~]$
Finally, you are back to a normal prompt on the cluster headnode, with no job id.
Note that if you run out of your allocated time, then the job will be killed automatically, leaving you back on the cluster headnode.
Graphical User Interface (GUI) application usage in an interactive job
By default you will not be able to use Graphical User Interface (GUI) applications on the HPC clusters as there is no graphical environment unless you take steps to configure one.
In order to use interactive resources X11 libraries are required to display the GUI of the application you wish to use.
X11 forwarding on Windows
Xming is a free X11 / X Window server for Microsoft Windows. It is useful for viewing GUI applications running on TCHPC cluster systems. These guidelines detail how to install the XMing server on a desktop computer.
-
The Xming software is available here
-
Select the "Save File" option.
- Run the Xming installer that you have downloaded.

-
Use the default options in the following windows.
-
Ensure the "Launch Xming" box is selected in the final window.

- The Xming icon should appear in the task tray when running.

- When using Putty to connect to TCHPC systems, you must check "Enable X11 forwarding"
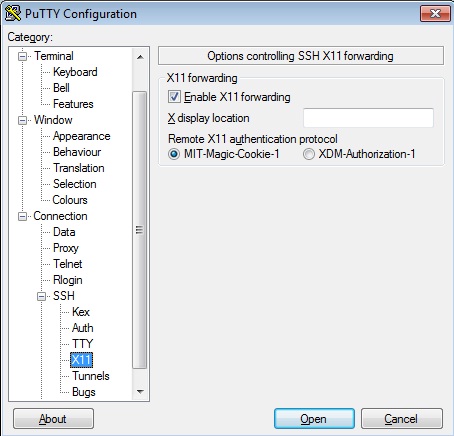
- Here you can find all the steps needed in order to setup Xming and Putty.
X11 forwarding on Linux
If SSH'ng from Linux, please include the -X flag, e.g.
[myuser@myhost ~]$ ssh -X neil@kelvin.tchpc.tcd.ie
Remember to replace "neil" with your username from that example.
Also remember, if then logging into a compute node you must again use the ssh -X ... option.
X11 forwarding on MacOS
The latest versions of Mac OS X no longer have the X11 libraries built in as per their support statement at http://support.apple.com/kb/HT5293.
In order to use the GUI applications from MacOS or OS X you will need to install the X11 libraries from the XQuartz project. Once installed you will need to log out and back in again for them to be detected.
Install it as you'd normally do for other MacOS/OS X apps.
Then you can SSH (with X forwarding enabled with the -X flag) to the headnode from the Terminal app on your Mac.
[myuser@myhost ~]$ ssh -X -l yourusername kelvin.tchpc.tcd.ie
Notes
-
Enter your password, as prompted.
-
Replace
yourusernamewith your own username. -
Replace
kelvinwith the correct hostname as per the table above if necessary.
Errors: "Unable to access the X Display"
If you get this error after running ssh command
Unable to access the X Display, is $DISPLAY set properly?
Ensure the following line is present in /etc/ssh/sshd_config
XAuthLocation /opt/X11/bin/xauth
If not, you can add it to either
/etc/ssh/sshd_config(System wide. You need root access) or$HOME/.ssh/config(Locally in your home folder)
In case you're adding it locally in your home folder, the file should look like this
  Host *
    ForwardX11 yes
    XAuthLocation /opt/X11/bin/xauth
Once this is done, try again to run ssh command as we did before.
Project Codes
Each compute job at TCHPC needs to be allocated to a project.
- Apply for a project code if you have not done so already.
The project code is used when submitting jobs to the Kelvin HPC cluster, (batch, or at the command line).
Batch Submission
You may add the optional -A parameter to your batch submission script (this is only important if you have more than one project code, and would like to specify which one to use; it defaults to the most recent otherwise).
#SBATCH -n 16
#SBATCH -t 10:00:00
#SBATCH -p compute
#SBATCH -A project_code
Command Line resource requests
You may add the optional '-A' parameter when requesting resources via srun or salloc.
> srun -N 8 -p compute -t 10:00:00 -A project_code
> salloc -N 8 -p compute -t 10:00:00 -A project_code
Which codes can I use, and what are my balances?
To see a list of project codes available to you, use the sbank balance statement command. For example :
[user01@kelvin01 ~]$ sbank balance statement
User             Usage |          Account       Usage | Account Limit   Available (CPU hrs)
---------- ----------- + ---------------- ----------- + ------------- -----------
user01          10,003 |     HPC_10_00248           0 |       400,000     389,997
user01               4 |     HPC_11_00991           0 |       400,000     399,996
See here for more details on slurm bank.
Error reported with invalid code
If you're trying to use an invalid code, or if you have yet to apply for one, or if you are not specifying a code and your account does not have a default code, you will see the following error message:
If using sbatch:
sbatch: error: Batch job submission failed: Invalid account or account/partition combination specified
If using salloc:
salloc: error: Failed to allocate resources: Invalid account or account/partition combination specified
Resolution
If you do have a project code for the relevant cluster please specify it.
If using salloc:
salloc -N 8 -p compute -t 10:00:00 -A project_code
If using sbatch:
#SBATCH -A project_code
You can check what project codes you have access to with the following command
sbank balance statement
Slurm Bank
SLURM Bank, a collection of wrapper scripts to give slurm GOLD like capabilities for managing resources. With the scripts we are able to provide a simple banking system where we can deposit hours to an account. Users are associated to these accounts from which they can use to run jobs. If users do not have an account or if they do not have hours in their account then they cannot run jobs.
SLURM bank is extremely simple and only very basic banking functionality is provided. That is when a user or a group of users run out of time in an account the jobs that are running will be immediately terminated. In SLURM bank we do not have reservation of time to ensure jobs complete, it is up to the user to figure that out, by doing so users will hopefully be more aware of the time that they have used. We also do not have the notion of crediting or overdrawing so if jobs fail due to system failures etc... users will not be automatically refunded hours. This issue will be left up to the users and admins to resolve.
Users can do
$: man sbank
or
$ sbank help
usage: sbank project <args>
   or: sbank user    <args>
   or: sbank deposit <args>
   or: sbank balance <args>
   or: sbank time    <args>
   or: sbank cluster <args>
   or: sbank submit  <args>
   or: sbank refund  <args>
   or: sbank version <args>

Available commands are:
    project    Manage projects and accounts
    user       Manage users (EXPERIMENTAL)
    deposit    Deposit hours to an account
    balance    Show balance sheet of account(s)
    time       Time calculator
    cluster    Manage clusters in slurmdbd
    submit     Wrapper to submit jobs
    refund     refund hours for a given jobid
    version    Show version information

Try 'sbank --help' for details.
To get information on what the commands do. The sbank commands are currently only available on
-
Kelvin
-
Parsons
If you do not have hours or an account to run jobs, please view the resource allocation page and request for an allocation (i.e. a project code).
Checking account balances
To check your balances use sbank balance statement, e.g.
$ sbank balance statement
User             Usage |          Account       Usage | Account Limit   Available (CPU hrs)
---------- ----------- + ---------------- ----------- + ------------- -----------
paddy               24 |           MSCHPC          62 |       315,360     315,298
paddy               13 |            TCHPC          30 |       315,360     315,330
To see the unformatted balance in a single account:
$ sbank balance statement -a tchpc
315330
To see everyone in a given account, in this example the TCHPC account:
$ sbank balance statement -a tchpc -A
User             Usage |          Account       Usage | Account Limit   Available (CPU hrs)
---------- ----------- + ---------------- ----------- + ------------- -----------
darach               0 |            TCHPC          30 |       315,360     315,330
dfrost               0 |            TCHPC          30 |       315,360     315,330
jose                 0 |            TCHPC          30 |       315,360     315,330
jtang               17 |            TCHPC          30 |       315,360     315,330
kbradley             0 |            TCHPC          30 |       315,360     315,330
neil                 0 |            TCHPC          30 |       315,360     315,330
paddy *             13 |            TCHPC          30 |       315,360     315,330
To see the balances of all accounts in the cluster:
$ sbank balance statement -A
User             Usage |          Account       Usage | Account Limit   Available (CPU hrs)
---------- ----------- + ---------------- ----------- + ------------- -----------

root                 0 |             ROOT           0 |             0           0

adamssl              0 |           MSCHPC          62 |       315,360     315,298
bogdanok             0 |           MSCHPC          62 |       315,360     315,298
dmcguire             0 |           MSCHPC          62 |       315,360     315,298
fghaffar             0 |           MSCHPC          62 |       315,360     315,298
jose                38 |           MSCHPC          62 |       315,360     315,298
kellyb8              0 |           MSCHPC          62 |       315,360     315,298
mjp                  0 |           MSCHPC          62 |       315,360     315,298
murphj33             0 |           MSCHPC          62 |       315,360     315,298
oboylese             0 |           MSCHPC          62 |       315,360     315,298
paddy *             24 |           MSCHPC          62 |       315,360     315,298
ruddlec              0 |           MSCHPC          62 |       315,360     315,298
thomasro             0 |           MSCHPC          62 |       315,360     315,298
valentj              0 |           MSCHPC          62 |       315,360     315,298

darach               0 |            TCHPC          30 |       315,360     315,330
dfrost               0 |            TCHPC          30 |       315,360     315,330
jose                 0 |            TCHPC          30 |       315,360     315,330
jtang               17 |            TCHPC          30 |       315,360     315,330
kbradley             0 |            TCHPC          30 |       315,360     315,330
neil                 0 |            TCHPC          30 |       315,360     315,330
paddy *             13 |            TCHPC          30 |       315,360     315,330
Checking if enough hours are available
Once you have an estimate of how much time you require you might want to check if you really have enough hours to run your job sbank-balance request can give you an idea if you have time or not, what the sbank-balance request command returns is the number of available hours after a request has been made. It does not do anything apart from print a number. If it returns a negative number then you do not have enough hours to run.
$ sbank balance request -c chuck -a tchpc -t 100
315260
Or else if you want to script things up to be efficient/lazy you can use some of the helper scripts such as sbank-time.
$ sbank balance request --cluster chuck --account tchpc \
    --time $( sbank time estimate -n 32 -t \
    $( sbank time calc -t 4-00:00:00 ))
If you want more more details this command can be run with the -v flag
$ sbank balance request -v --cluster chuck --account tchpc \
    --time $( sbank time estimate -n 32 -t \
    $( sbank time calc -t 2000-00:00:00 ))

Current balance = 315,326
Requested hours = 1,536,000
Expected balance = -1,220,674
You can also feed sbank-balance a job script to see if the script's request can be completed or not
$ sbank balance checkscript -s sample-job1.sh  -t myaccount
312288
The above command returns the remaining balance of your specified account on the current cluster. If a negative value is returned, then your job will most likely not complete if it is submitted.
Estimating time for a job
There will be times when you will need to figure out how many CPU hours you need to see if it exceeds the available hours in your account balance. This can be done with using the sbank-time estimate command. Assuming that you wish to run a 64 node job with 2 cores per node, that's 128 cores for 72hrs of wall time
$ sbank time estimate  -N 64 -c 2 -t 72
9216
Or you want to run 256 tasks for 48hrs
$ sbank time estimate  -n 256 -t 48
12288
You can also use sbank-time's helper function 'estimatescript' to check the job script that you have
$ sbank time estimatescript -s sample-job1.sh
3072
Where the contents of sample-job1.sh
#!/bin/bash

#SBATCH -n 32
#SBATCH -t 4-00:00:00

echo "HELLO WORLD"
Slurm task-farming
If you have multiple independent serial tasks, you can pack them together into a single Slurm job. This is suitable for simple task-farming.
This can take advantage of the fact that a single node in the cluster has many CPU cores available. For example, each kelvin node has 12 cores, so you can pack up to 12 tasks into a single job.
We recommend no more than 24 cores for task-farming jobs on kelvin.
Note: For Slurm partitions with OverSubscribe=Yes (formerly Shared=Yes), Slurm Job Arrays are a better solution for submitting multiple tasks. However, with OverSubscribe=Exclusive, job arrays will allocate a full node for each serial task, which is probably not what you want.
The staskfarm script can be found here: https://github.com/paddydoyle/staskfarm
Overview
In order to use the taskfarming setup in Slurm, the workflow is as follows:
-
create a text file (e.g.
commands.txt) which contains your tasks, written as one task per line -
create a job submission script as normal, asking for the desired number of cores (e.g. 8 if you have 8 tasks to run)
-
in the submission script, load the taskfarming module, and any other modules that you need
-
launch the commands via the
staskfarmwrapper
There are modes of operation for using the staskfarm script:
-
A single command file containing multiple commands:
staskfarm command.txt -
A single command with multiple parameters:
staskfarm command param [param]...
How to use the taskfarming wrapper: single command file
First, create a text file (e.g. commands.txt) with the serial tasks written as one task per line.
For example, the following shows 6 tasks:
./my_prog my_input01 > my_output01
./my_prog my_input02 > my_output02
./my_prog my_input03 > my_output03
./my_prog my_input04 > my_output04
./my_prog my_input05 > my_output05
./my_prog my_input06 > my_output06
Then, create a slurm submission script (e.g. job.sh) with the usual #SBATCH parameters. In particular, set the number of cores to match the number of lines in the commands.txt file. Also, load the staskfarm module.
#!/bin/sh
#SBATCH -n 6
#SBATCH -t 02:30:00  # 2 hours and 30 minutes
#SBATCH -p compute   # partition name
#SBATCH -J task_farming_job # sensible name for the job

# [load the modules](#load-the-modules)
module load apps staskfarm

# [execute the commands via the slurm task farm wrapper](#execute-the-commands-via-the-slurm-task-farm-wrapper)
staskfarm commands.txt
And then finally, submit the job as normal with sbatch job.sh.
More examples
Note that if you supply more tasks than allocated CPU cores, it will allocate them in a simple round-robin manner. So if you have allocated 8 cores, it is fine to have the following commands.txt; the wrapper will allocate them to CPUs, with no more than 8 running at a time.
./my_prog my_input01 > my_output01
./my_prog my_input02 > my_output02
./my_prog my_input03 > my_output03
./my_prog my_input04 > my_output04
./my_prog my_input05 > my_output05
./my_prog my_input06 > my_output06
./my_prog my_input07 > my_output07
./my_prog my_input08 > my_output08
./my_prog my_input09 > my_output09
./my_prog my_input10 > my_output10
./my_prog my_input11 > my_output11
./my_prog my_input12 > my_output12
./my_prog my_input13 > my_output13
./my_prog my_input14 > my_output14
./my_prog my_input15 > my_output15
./my_prog my_input16 > my_output16
A more complex example, showing 4 tasks which include loops:
cd sample01; for i in controls patients; do ./my_prog $i; done
cd sample02; for i in controls patients; do ./my_prog $i; done
cd sample03; for i in controls patients; do ./my_prog $i; done
cd sample04; for i in controls patients; do ./my_prog $i; done
Enabling verbose mode prints each command to stdout as it is read from the command file.
How to use the taskfarming wrapper: single command with multiple parameters
As an alternative to putting the commands in a file, you can launch the staskfarm script with a single command followed by multiple parameters. This version is inspired by the work of Christian Meesters at the ZDV centre in University of Mainz.
For example, the following shows 6 tasks launched with explicit parameters:
#!/bin/sh
#SBATCH -n 6
#SBATCH -t 02:30:00  # 2 hours and 30 minutes
#SBATCH -p compute   # partition name
#SBATCH -J task_farming_job # sensible name for the job

# [load the modules](#load-the-modules)
module load apps staskfarm

# [execute the commands via the slurm task farm wrapper, using the parameter sweep form](#execute-the-commands-via-the-slurm-task-farm-wrapper-using-the-parameter-sweep-form)
staskfarm ./my_prog my_input01 my_input02 my_input03 my_input04 my_input05 my_input06
Another example shows using shell globs (wildcards) to specify the parameters:
#!/bin/sh
#SBATCH -n 6
#SBATCH -t 02:30:00  # 2 hours and 30 minutes
#SBATCH -p compute   # partition name
#SBATCH -J task_farming_job # sensible name for the job

# [load the modules](#load-the-modules)
module load apps staskfarm

# [execute the commands via the slurm task farm wrapper, using the parameter sweep form with shell glob](#execute-the-commands-via-the-slurm-task-farm-wrapper-using-the-parameter-sweep-form-with-shell-glob)
staskfarm ./my_prog *.inp
Note that in this mode of operation, no output redirection is performed.
Slurm task-farm wrapper notes
Note the following about the staskfarm slurm task-farm wrapper script:
-
The use of MPI is not supported in the tasks. Only serial tasks can appear in the task lists.
-
It writes the list of tasks to K files, where K is the value of the SLURM_NTASKS environment variable. The tasks are written in a simple round-robin manner over the K files. This makes no provision for how quickly any individual task might execute compared to the others, and so an equal division of labour between the SLURM_NTASKS processors is not guaranteed at all.
-
It makes no decisions about memory usage per task. The assumption is that the user has already calculated memory consumption, and has used a combination of
#SBATCH -n <n>and#SBATCH -N <N>to fit. For example, if the node has 8 cores and 16 GB of RAM, then#SBATCH -n 8will spread the tasks over 8 cores on one machine, and will assume that the total memory usage is no more than 16GB (2GB per task). If you need 4GB per task, then instead you must use#SBATCH -n 8and#SBATCH -N 2in order to spread the 8 tasks over 2 nodes. -
No output redirection is performed, so any stdout/stderr will be sent to the slurm-NNNNN.out file by default. This can be changed by adding individual redirects to each task. Care must be taken in that case so that the output files have unique names/paths.
-
There is an optional
-vparameter for verbose output (to print each command to stdout as it reads it from the commands file) -
The
staskfarmprogram will create a temporary directory (called.taskfarm_job_${SLURM_JOB_ID}) in which to store the slurm multi-config files.
Slurm task-farming for Python scripts
As noted in the page on Slurm task-farming above, we can pack multiple tasks into a single slurm job. This can be of benefit when nodes are configured not to share jobs.
On this page, we will note a Python-specific example of using the staskfarm script.
We assume a single Python script which can take command-line arguments; the job is to run many instances of the script with many different command-line arguments (e.g. a parameter sweep).
We will:
-
Create a
commands.txtfile which contains all of the invocations of the script -
Create a job submission script, asking for 12 cores (2 nodes on kelvin). This means that out of the many Python invocations, at most 24 will run simultaneously.
The commands.txt file is as follows
python ./my-python-script.py input01 > script.out.01 2>&1
python ./my-python-script.py input02 > script.out.02 2>&1
python ./my-python-script.py input03 > script.out.03 2>&1
python ./my-python-script.py input04 > script.out.04 2>&1
python ./my-python-script.py input05 > script.out.05 2>&1
python ./my-python-script.py input06 > script.out.06 2>&1
python ./my-python-script.py input07 > script.out.07 2>&1
python ./my-python-script.py input08 > script.out.08 2>&1
python ./my-python-script.py input09 > script.out.09 2>&1
python ./my-python-script.py input10 > script.out.10 2>&1
python ./my-python-script.py input11 > script.out.11 2>&1
python ./my-python-script.py input12 > script.out.12 2>&1
python ./my-python-script.py input13 > script.out.13 2>&1
python ./my-python-script.py input14 > script.out.14 2>&1
python ./my-python-script.py input15 > script.out.15 2>&1
python ./my-python-script.py input16 > script.out.16 2>&1
python ./my-python-script.py input17 > script.out.17 2>&1
python ./my-python-script.py input18 > script.out.18 2>&1
python ./my-python-script.py input19 > script.out.19 2>&1
python ./my-python-script.py input20 > script.out.20 2>&1
python ./my-python-script.py input21 > script.out.21 2>&1
python ./my-python-script.py input22 > script.out.22 2>&1
python ./my-python-script.py input23 > script.out.23 2>&1
python ./my-python-script.py input24 > script.out.24 2>&1
python ./my-python-script.py input25 > script.out.25 2>&1
python ./my-python-script.py input26 > script.out.26 2>&1
python ./my-python-script.py input27 > script.out.27 2>&1
python ./my-python-script.py input28 > script.out.28 2>&1
python ./my-python-script.py input29 > script.out.29 2>&1
python ./my-python-script.py input30 > script.out.30 2>&1
python ./my-python-script.py input31 > script.out.31 2>&1
python ./my-python-script.py input32 > script.out.32 2>&1
Then, create a slurm submission script (e.g. job.sh) with the usual #SBATCH parameters. In particular, set the number of cores be 16 in this instance. Also, load the staskfarm module. If you need a particular version of Python from the modules, load it as well.
#!/bin/sh
#SBATCH -n 16
#SBATCH -t 02:30:00  # 2 hours and 30 minutes
#SBATCH -p compute   # partition name
#SBATCH -J task_farming_job # sensible name for the job

# [load the modules](#load-the-modules)
module load apps staskfarm
# [we need Python 2.7](#we-need-python-27)
module load gcc python/2.7.18

# [execute the commands via the slurm task farm wrapper](#execute-the-commands-via-the-slurm-task-farm-wrapper)
staskfarm commands.txt
And then finally, submit the job as normal with sbatch job.sh.
Quotas
User and Project Quotas are in force on our HPC Clusters.
User Quotas
Currently on the main clusters (Parsons, Kelvin) the shared /home filesystem operates with the following quota limit for all users:
- 50GB
Project Quotas
Quotas are allocated on a per-group basis in the /projects filesystem. Quotas are assigned per-PI (Principal Investigator), with the onus on the PI and their group to manage files and ensure that they remain under quota.
Viewing your Quota Usage
The following tool has been provided to show you your quota usage:
> myquota
This will report back both your personal quota, and the quotas for any projects you are a member of.